
1. Installing Razor - Yes the New Version..
2. Razor - DHCP and TFTP
3. Installing the Razor client and creating a repository
4. Installers, Policies and Tags
5. Razor - What Lies Within the installer?
6. Installing ESXi with Razor
I assume that some of you are familiar with Razor - the provisioning system that was open sourced by EMC and written partially by Nick Weaver - his post about razor is here.
Jonas Rosland (@virtualswede) created a great walkthrough on how to deploy a provisioning server, and get yourself up and running.
In July 2013, the team decided on a new direction and a complete re-write of the product.
Does that change anything? Yes! The instructions in the walkthroughs above do not work any more - since the core functionality has changed - substantially. This now a fully owned PuppetLabs project.
When you run.. puppet module install puppetlabs-razor, that means you will get the new version of razor - not the previous version, and the steps above will not work. This first part will explain how to install the razor server.
Most of the information in this post is also available on the Installation Wiki
First the pre-requisites and caveats:
- This was done on a freshly installed Ubuntu 12.04 VM. (The commands should
- This is the way I got it to work, it does not necessarily mean that this is the optimal way.
- I preferred to use the method of installing from Source and not the prepackaged modules (for a number of reasons).
apt-get update
apt-get install postgresql libarchive-dev curl git openjdk-7-jre-headless -y
Postgres is the database that is used, curl is not installed by default, git will be used for the source installation, libarchive is used to unpack the ISO images and we will need the JDK for some of the of the Ruby pieces
Next we will prepare the database. Change the the following file /etc/postgresql/9.1/main/pg_hba.conf and add modify the file as below.
# Database administrative login by Unix domain socket
local all postgres peer
# TYPE DATABASE USER ADDRESS METHOD
host all all 127.0.0.1/32 md5
# "local" is for Unix domain socket connections only
local all all peer
Changing context to the postgres user, create the user. You will be prompted for a password (twice).
createuser -P -SDR razor

Create the three databases, and go back to the root user.
createdb -O razor razor_dev
createdb -O razor razor_test
createdb -O razor razor_prd
exit


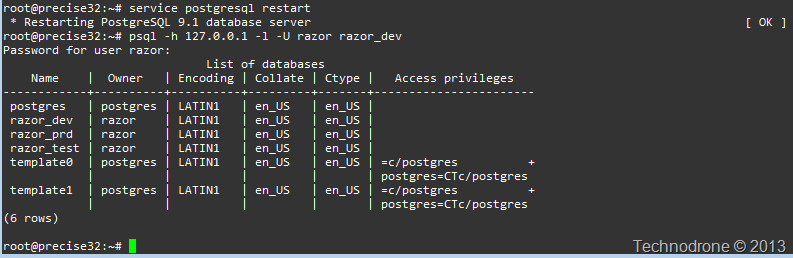
Restart the PostgreSQL service and check if the tables exist. You will be asked for the password for the razor user you created previously.
service postgresql restart
psql -h 127.0.0.1 -l -U razor razor_dev
Here you see that there are 3 databases - owned by the razor user.Next we install rvm. We will use rvm to install the specific jruby version (1.7.4) that we are going to use. And source the file - so we can use it immediately.curl -L https://get.rvm.io | bash
source /etc/profile.d/rvm.sh
(Updated 14/11/13)
After receiving some feedback from the razor guys - it was pointed out to me that rvm was the not the most ideal way to handle your ruby environment, rbenv is a much better solution. Here are the steps.
curl https://raw.github.com/fesplugas/rbenv-installer/master/bin/rbenv-installer | bash
And now to the correct bits to your top of your profile.
# rbenv
export RBENV_ROOT="${HOME}/.rbenv"
if [ -d "${RBENV_ROOT}" ]; then
export PATH="${RBENV_ROOT}/bin:${PATH}"
eval "$(rbenv init –)"
fi
Reload the shell.


source ~/.bashrc
Install all the dependencies. This will download all the dependencies needed.rbenv bootstrap-ubuntu-12-04
I found a gem that automatically runs rbenv rehash after each installation - which will save some time and worries.git clone https://github.com/sstephenson/rbenv-gem-rehash.git ~/.rbenv/plugins/rbenv-gem-rehash


Install jruby 1.7.4 and set that as our global environment.Next we install jruby-1.7.4rvm install jruby-1.7.4
rbenv install jruby-1.7.4
rbenv rehash && rbenv global jruby-1.7.4

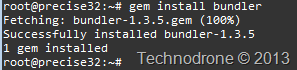
Install bundler.
gem install bundler
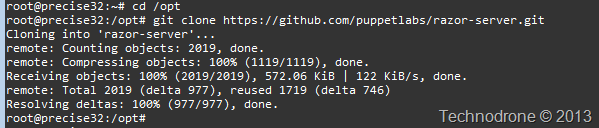
Clone the source code the local computer.
cd /opt
git clone https://github.com/puppetlabs/razor-server.git
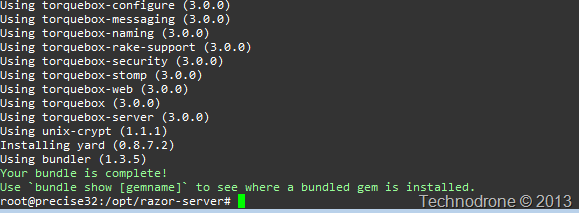
Retrieve the rest of the gems required. You will see a long list of gems downloaded and installed.
cd razor-server/
bundle install
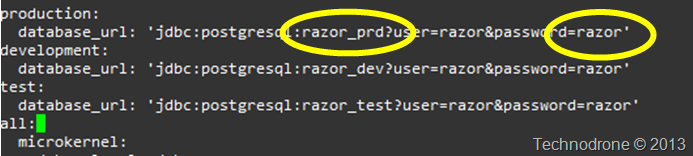
Create the config file and add in the necessary information. Here you will need the names of the databases you created before (razor_dev, razor_test, razor_prd) and the password for your razor user (in my case - razor).
cp config.yaml.sample config.yaml
nano config.yaml
You will change the 3 connection strings in the file - like the example below. (please make sure you have the correct database names!!)
Create a directory that will be the location of the installation ISO's.
mkdir -p /var/lib/razor/repo-store
Next we prepare the database.
rake db:migrate

And then prepare the web service for deployment, and start the process in the background.
torquebox deploy
torquebox run --bind-address 0.0.0.0 &
You will then see a lot of output on the screen until you should get a line similar to the one below - showing that razor is now started.

If all was done correctly - you should not have any errors in the output and we will verify the API is now available by going to http://razor:8080/api .
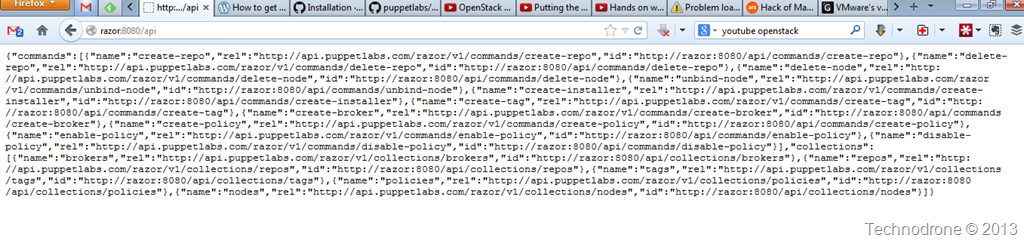
If you get a json reply as above then your server is up and functioning.
In the next post - we will see how to get to prepare the DHCP and TFTP parts of the solution.