Showing posts with label Automation. Show all posts

2018-09-27

Replacing the AWS ELB - Final Thoughts

This is the last part in the Replacing the AWS ELB series.
  1. Replacing the AWS ELB - The Problem
  2. Replacing the AWS ELB - The Challenges 
    1. Replacing the AWS ELB - The Design
    2. Replacing the AWS ELB - The Network Deep Dive
    3. Replacing the AWS ELB - Automation
    4. Replacing the AWS ELB - Final Thoughts (this post)

    If you haven't already read the previous posts in the series - please take the time to go through them.

    So here are some additional thoughts and ideas about the whole journey.

    First and foremost - none of this would have been possible without group effort of the team that worked on this.
    Udi, Mark, and Mike - thank you all for your input, help and hard work that went into this.

    Was it all worth it?

    Yes, yes and hell yes!! The cost of having to refactor applications to work with the way that the AWS ELB works - was not financially viable and would take far to long . There was no way we could make our delivery dates and have all the applications modify the way they worked.

    So not only was it worth it - it was a necessity, without this - the project was a non-starter.

    What was the hardest part of the solution?

    Definitely the automation. We had the solution white-boarded out after a an hour or two, brought up a PoC within another hour or two.

    As I said somewhere else in the post - if this was a one-off then it would not have been worth while - but we needed about 10 pairs of haproxy instances in each deployment - and there were 10- 15 deployments - so manual was not going to work here. There was a learning curve that we needed to get over and that took some time.

    This can't be all you were doing with haproxy..

    Of course not.. The configurations in the examples are really basic and simple. The actual haproxy.cfg was a lot more complicated and was generated on the fly using Consul and consul-template. This allows for some very interesting and wonderful things that can be accomplished. The instances were what could be considered as pets, because they were hardly re-provisioned, but the configuration was constantly changing based on the environment.

    So did you save money?

    No! This was more expensive than provisioning an ELB from AWS. The constraints dictated that this was the chosen solution - not cost. Well in a way this was wasted resources, because there are instances that are sitting idle most of the time - without actually doing anything. The master-slave model is not a cost effective solution because you are spending money to address a scenario when (and if)  you lose a node.

    Does this scale? How?

    We played around with this a bit and also created a prototype that provisioned an auto scaling group with that would work active-active-active with multiple haproxy's - but this required some changes in the way we did our service discovery. This happened a good number of months after we went live - as part of the optimization stage.  Ideally - this would have been the way we would have chosen if we could do it over again.

    For this example the only way to scale is to scale up the instances sizes - not to scale out.

    So to answer the question above - in the published form - no it does not.

    Any additional benefits to rolling your own solution?

    This could be ported to any and every cloud - or deployment you would like. All you need to do it change the modules and the parts that interact directly with AWS with the cloud of your choice - and it would probably work. It is not a simple rip and replace - but the method would work - just would take a bit of extra time and coding.

    What about external facing load balancers - will this work?

    Yes, all you will need to do is replace the routes - with an elastic IP, and have the keepalived script switch the EIP from one instance to another. I should really post about that as well.

    So why did you not use an EIP in the first place?

    Because the this was internal traffic. If I was to use an external facing load balancer, the traffic would essentially go out to the internet and come back in - for two instances that were in the same subnet in the same AZ. This does not make sense neither from a financial nor a security perspective. 

    Can I contact you if I have any specific questions on the implementation?

    Please feel free to do so. You can either leave a comment on any of the posts in the series, ping me on Twitter (@maishsk), or use the contact me on the top.
    Replacing the AWS ELB - Automation

    This is Part 5 in the Replacing the AWS ELB series.
    1. Replacing the AWS ELB - The Problem
    2. Replacing the AWS ELB - The Challenges
      1. Replacing the AWS ELB - The Design
      2. Replacing the AWS ELB - The Network Deep Dive
      3. Replacing the AWS ELB - Automation (this post)
      4. Replacing the AWS ELB - Final Thoughts
      It goes without saying that anything that I have described in the previous posts can be accomplished - it is just a really tedious work to go through all the stages when you are doing this manually.
      Let's have a look at the stages
      1. Create an IAM role with a specific policy that will allow you to execute commands from within the EC2 instances
      2. Create a security group that will allow the traffic to flow between and to your haproxy instances
      3. Deploy 2 EC2 instances - one in each availability zone
      4. Install the haproxy and keepalived on each of the instances
      5. Configure the correct scripts on each of the nodes (one for master and the other for slave) and setup the correct script for transferring ownership on each instance.

      If you were to to all of this manually then this could probably take you a good 2-3 hours to set up a highly-available haproxy pair. And how long does it take to setup an AWS ELB? Less than 2 minutes? This of course is not viable - especially since it should be something that is automated and something that is easy to use.
      This one will be a long post - so please bare with me - because I would like to explain in detail how this exactly works.
      First and foremost - all the code for this post can be found here on GitHub - https://github.com/maishsk/replace-aws-elb (please feel free to contribute/raise issues/questions)

      (Ansible was my tool of choice - because that is what I am currently working with - but this can also be done in any tool that you prefer).

      The Ansible playbook is relatively simple

      Part one has 3 roles.

      1. Create the IAM role
      2. Create the security group
      3. Create the instances

      The part two - set's up the correct routing that will send the traffic to the correct instance
      The part three -  goes into the instances themselves and sets up all the software.

      Let's dive into each of these.

      Part One

      In order to allow the haproxy instances to modify the route they will need access to the AWS API - this is what you should use an IAM role for. The two policy files you will need are here. Essentially for this - the only permissions that the instance will need are:

      I chose to create this IAM role as a managed policy and not as a inline policy for some reasons that will be explained in a future blog post - both of these work - so you can choose whatever works for you.

      Next was the security group - and the ingress rule I used here - was far too permissive - it opens the SG to all ports within the VPC - the reason that this was done was because the haproxy here was used to proxy a number of applications - on a significant number of ports - so the decision was to open all the ports on the instances. You should evaluate the correct security posture for your applications.

      Last but not least - deploying the EC2 instances - pretty straight forward - except for the last part where I preserve a few bits of instance details for future use.

      Part Two

      Here I get some information about all the rout tables in the VPC you are currently using. This is important because you will need to update the route table entries here for each of the entries. The reason that this is done through a shell script and not an Ansible module - was because the module does not support updates - only create or delete - which would made the process of collecting all the existing entries, storing them and them adding a new one to the list - was far too complicated. This is an Ansible limitation - and a simple way to get around it.

      Part Three

      So the instances themselves have been provisioned. The whole idea of VRRP presumes that one of the nodes is a master and the other is  the slave. The critical question is how did I decide what should be the master and which one would be the slave?

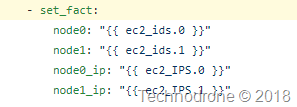
      This was done here. When the instances are provisioned - they are provisioned in a random order, but they have a sequence in which they were provisioned - and it is possible to access this sequence - from this fact. I then exposed it in a simpler form here - for easier re-use.

      facts

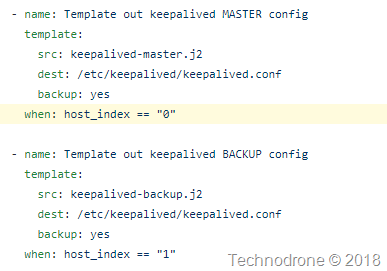
      Using this fact - I can now run some logic during the software installation based on the identity of the instance. you can see how this was done here.

      identity

      The other part of where the identity of the node is used is in the jinja templates. the IP address of the node is injected into the file based on the identity.

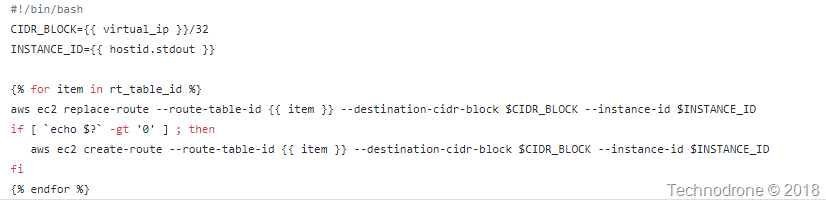
      And of course the script that the instance uses to update the route table uses facts and variables collected from different places throughout the playbook.

      bash_script

      One last thing of course. The instance I used was the Amazon Linux - which means that the AWS cli is pre-installed. If you are using something else - then you will need to install the CLI on your own.  The instances of course get their credentials from the IAM role that is attached, but when running an AWS cli command - you also need to provide an AWS region - otherwise - the command will fail. This is done with jinja (again) here.

      One last thing - in order for haproxy to expose the logs - a few short commands are necessary.
      Here you have a fully provisioned haproxy pair that will serve traffic internally with a single virtual IP.

      Here is asciinema recording of the process - takes just of 3 minutes


      In the last post - I will go into some of the thoughts and lessons learned during this whole exercise.

      2018-09-02

      Replacing the AWS ELB - The Design

      This is Part 3 in the Replacing the AWS ELB series.
      1. Replacing the AWS ELB - The Problem
      2. Replacing the AWS ELB - The Challenges
        1. Replacing the AWS ELB - The Design (this post)
        2. Replacing the AWS ELB - The Network Deep Dive
        3. Replacing the AWS ELB - Automation
        4. Replacing the AWS ELB - Final Thoughts

        So how do you go about using an IP address in a VPC and allow it to jump between availability zones?

        The solution to this problem was mentioned briefly in a slide in a re:invent session - which for the life of me I could not find (when I do I will post the link).

        The idea is to create an "overlay" network within the VPC - which allows you to manage IP addresses even though they don't really exist in the VPC.

        A simple diagram of such a solution would look something like this:

        standard_haproxy

        Each instance would be configured with an additional virtual interface - with an IP address that was not part of the CIDR block of the VPC - that way it would not be a problem to move it from one subnet to another.

        If the IP address does not actually exist inside the VPC - how do you get traffic to go to it?

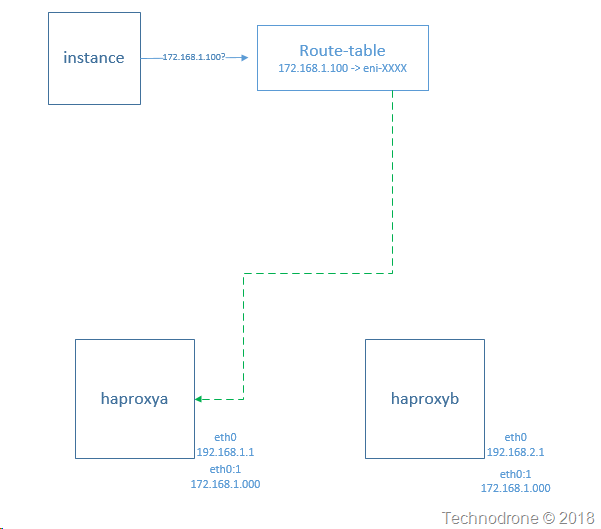
        That is actually a simple one to solve - by creating a specific route on each of the subnets - that routes traffic to a specific ENI (yes it is possible).

        add_route

        The process would be something like this:

        start

        An instance will try to access the virtual IP - it will go to the Route table on the Subnet and and because of the specific entry - it will be routed to a specific instance.

        The last piece of the puzzle is how do you get the route to jump from one instance to the other instance of haproxy, this would be the initial state.

        initial

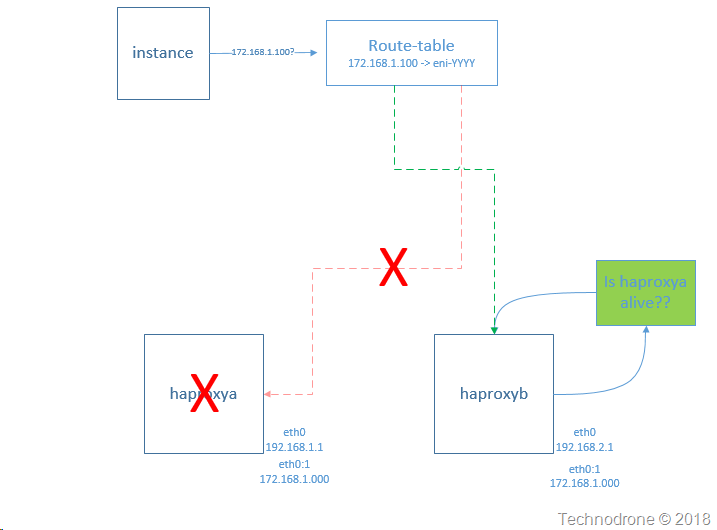
        haproxya fails or the AZ goes down

        haproxya_fail
        haproxyb recognizes this failure
        recognize_failure

        And then makes a call to the AWS API to move the route to a different ENI located on haproxyb

        move_to_haproxyb

        In the next post - we will go into a bit more detail on how the network is actually built and how the failover works.

        2018-08-29

        Replacing the AWS ELB - The Network Deep Dive

        This is Part 4 in the Replacing the AWS ELB series.

      3. Replacing the AWS ELB - The Problem
      4. Replacing the AWS ELB - The Challenges
      5. Replacing the AWS ELB - The Design
      6. Replacing the AWS ELB - The Network Deep Dive  (this post)
      7. Replacing the AWS ELB - Automation
      8. Replacing the AWS ELB - Final Thoughts

      9. Why does this whole thing with the network actually work? Networking in AWS is not that complicated - (sometimes it can be - but it is usually pretty simple) so why do you need to add in an additional IP address into the loop - and one that is not even really part of he VPC?

        To answer that question - we need to understand the basic construct of the route table in an AWS VPC. Think of the route table as a road sign - which tells you where you should go .

        directions
        Maybe not such a clear sign after all
        (Source: https://www.flickr.com/photos/nnecapa)


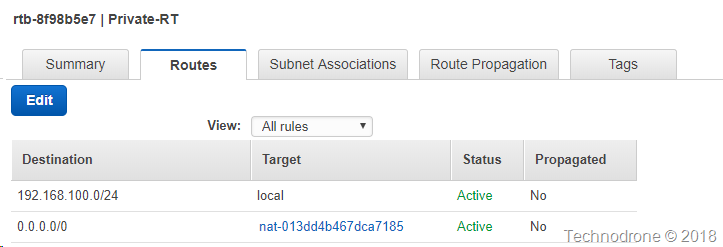
        Here is what a standard route table (RT) would look like

        route

        The first line says that all traffic that is part of your VPC - stays local - i.e. it is routed in your VPC, and the second line says that all other traffic that does not belong in the VPC - will be sent another device (in this case a NAT Gateway).

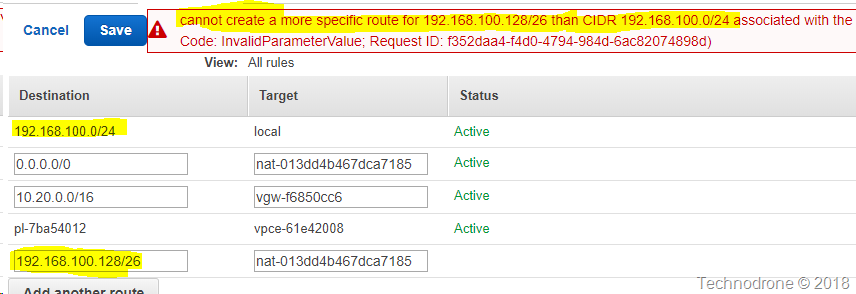
        You are the master of your RT - which means you can route traffic destined for any address you would like - to any destination you would like. Of course - you cannot have duplicate entries in the RT or you will receive an error.

        route_error1

        And you cannot have a smaller subset the traffic routed to a different location - if a larger route already exists.

        route_error2

        But otherwise you can really do what you would like.
        So defining a additional interface on an instance is something that is straight forward.

        For example on a Centos/RHEL instance you create a new file in /etc/sysconfig/network-scripts/
        DEVICE="eth0:1"
        BOOTPROTO="none"
        MTU="1500"
        ONBOOT="yes"
        TYPE="Ethernet"
        NETMASK=255.255.255.0
        IPADDR=172.16.1.100
        USERCTL=no

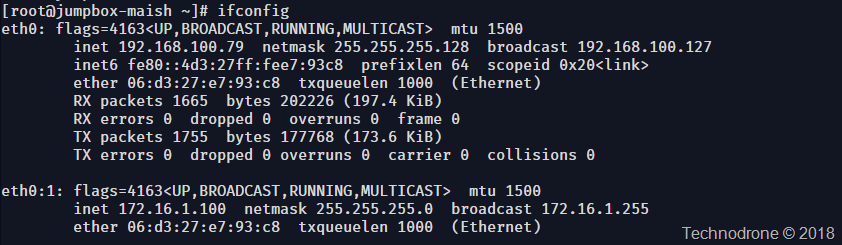
        This will create a second interface on your instance.

        ip

        Now of course the only entity in the subnet that knows that the IP exists on the network - except the instance itself.
        That is why you can assign the same IP address to more than a single instance.

        network_4


        Transferring the VIP to another instance

        In the previous post the last graphic showed in the case of a failure - haproxyb would send an API request that would transfer the route to the new instance.

        keepalived has the option to run a script that execute when the it's pair fails - it is called a notify

        vrrp_instance haproxy {
          [...]
          notify /etc/keepalived/master.sh
        }


        That is a regular bash script - and that bash script - can do whatever you would like, luckily that allows you to manipulate the routes through the AWS cli.

        aws ec2 replace-route --route-table-id <ROUTE_TABLE> --destination-cidr-block <CIDR_BLOCK> --instance-id <INSTANCE_ID>

        The parameters you would need to know are:

        • The ID of the route-table entry you need to change
        • The network of that you want to change
        • The ID of the instance that it should be

        Now of course there are a lot of moving parts that need to come into place for all of this to work - and doing it manually would be a nightmare - especially at scale - that is why automation is crucial.

        In the next post - I will explain how you can achieve this with a set of Ansible playbooks.

        Replacing the AWS ELB - The Challenges

        This is Part 2 in the Replacing the AWS ELB series.
        1. Replacing the AWS ELB - The Problem
        2. Replacing the AWS ELB - The Challenges (this post)
          1. Replacing the AWS ELB - The Design
          2. Replacing the AWS ELB - The Network Deep Dive
          3. Replacing the AWS ELB - Automation
          4. Replacing the AWS ELB - Final Thoughts

          Now that you know the history from the previous post - I would like to dive into the challenges that I faced during the design process and how they were solved.


          High Availability


          One of the critical requirements was "Must not be a single point of failure" - which means whatever solution that we went with - must have some kind of High availability.

          Deploying a highly available haproxy cluster (well it is a master/slave deployment - it cannot really scale) is not the that hard of a task to accomplish.

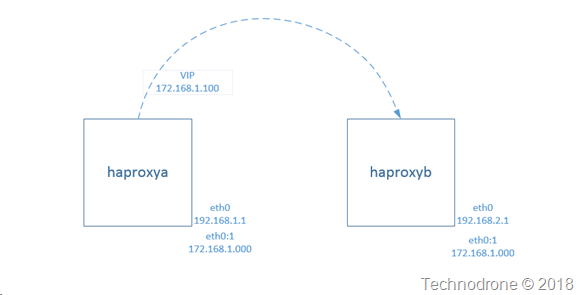
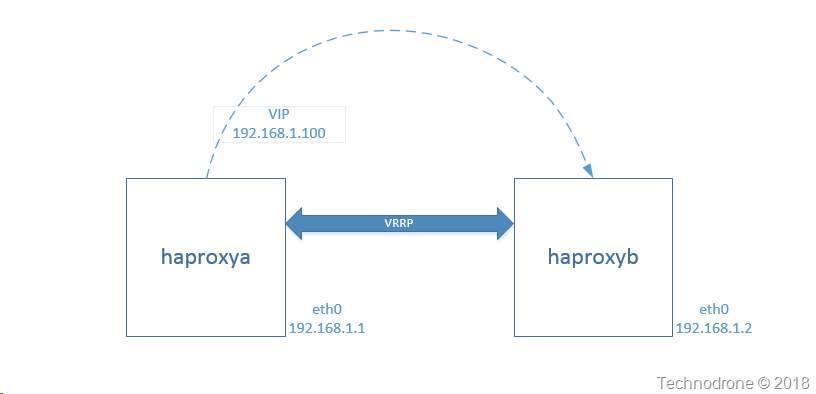
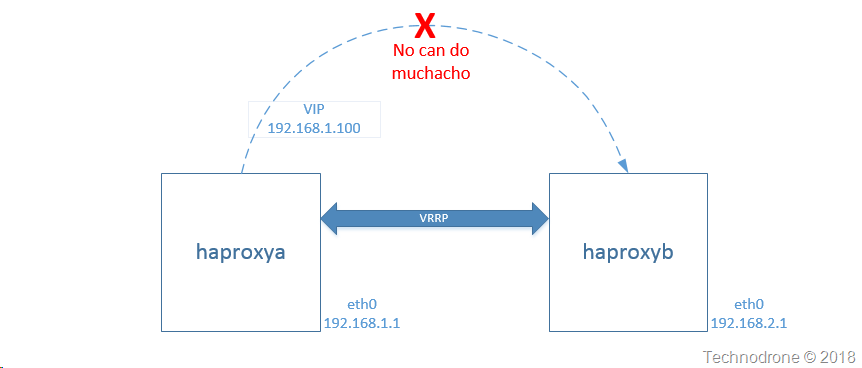
          Here is a simple diagram to explain what is going on.

          haproxy-ha

          Two instances, each one has the haproxy software installed - and they each have their own IP address.

          A virtual IP is configured for the cluster and and with keepalived we maintain the state between the two instances. Each of them is configured with a priority (to determine which one of them is the master/slave) and there is a heartbeat between them vrrp is used to maintain a virtual a virtual router (or interface between them). If the master goes down - then the slave will take over. When the master comes back up - then the slave will relinquish control back to the master.
          This works - flawlessly.

          Both haproxy's have the same configuration - so if something falls over - then the second instance can (almost) instantly start serving traffic.


          Problem #1 - VRRP

            VRRP uses multicast - https://serverfault.com/questions/842357/keepalived-sends-both-unicast-and-multicast-vrrp-advertisements - but that was relatively simple to overcome - you can configure keepalived to use unicast - so that was one problem solved.

            Problem #2 - Additional IP address

            In order for this solution to work - we need an additional IP address - the VIP. How do you get an additional IP address in AWS - well that is well documented here - https://aws.amazon.com/premiumsupport/knowledge-center/secondary-private-ip-address/. Problem solved.

            Problem #3 - High Availability

            So we have the option to attach an additional ENI to the cluster - which would allow us to achieve something similar to what we have above - but this introduced a bigger problem.

            All of this would only work in a single Availability Zone - which means that the AZ was a single point of failure - and therefore was in violation of requirement #2 - which would not work.

            As it states clearly in the AWS documentation a subnet cannot span across multiple AZ's

            vpc-faq

            Which means this will not work..

            cross-az

            Let me explain why not.

            A network cannot span multiple AZ's. That means if we want the solution deployed in multiple AZ's - then it needs to be deployed across multiple subnets (192.168.1.0/24 and 192.168.2.0/24) each in their on AZ. The idea of taking a additional ENI from one of the subnets and using it as the VIP - will work only in a single AZ - because you cannot move the ENI from one subnet in AZ1 - to another subnet in AZ2.

            This means that the solution of having a VIP in one of the subnets would not work.

            Another solution would have to explored - because having both haproxy nodes in a single AZ - was more or less the same as having a single node not exactly the same but still subject to a complete outage if the the entire AZ would go down).

            Problem #4 - Creating a VIP and allow it to traverse AZ's

            One of the biggest problems that I had to tackle was how do I get an IP address to traverse Availability zones?

            The way this was done can be found in the next post.

            2018-08-21

            Scratching an itch with aws-vault-url

            I think that aws-vault is a really nice tool. It prevents you from saving your AWS credentials in plain text on your machines (which is always a good thing)

            Since I started using it – I found a number of difficulties along the way.

            1. aws-vault does not support aarch64 #261

              To solve this - I created my own binary - aws-vault on a Chromebook

            2. aws-vault only supports storing credentials when using a fully blown GUI. Here is a really good walkthrough how to get this working https://www.tastycidr.net/using-aws-vault-with-linux/

            3. aws-vault login will give you a URL with which you can paste into a browser and it will log you in automatically to the AWS console. My pet peeve with this was that it always brings you to the default console page.

              image

              So I was thinking – why would I not be able to open up the specific console that I would like to access – such as S3 or EC2 – I mean come on … these are just different URLs that need to be opened in the same way.


            Now if I was a go developer – I would happily have contributed this back to the original project – but I am not. I am not really a developer at all. I can play with code – I can also create stuff – but I would not dare call myself someone who can write an application.

            So I wrote a small wrapper script to provide this functionality.

            Say hello to aws-vault-url – an easier way to open a direct conosle for a specific product.

            (This is in no way a robust tool – and if you would like to contribute and improve it – please feel free to submit a PR)

            Update – 22/08/2018

            So I did some thinking about this – and came to the conclusion that it makes no sense to maintain a separate tool – so I decided to take the leap and push myself to go into the code it self – so I sat for an hour or two last night, and extended the current functionality of aws-vault to accommodate this.

            Here is the PR - https://github.com/99designs/aws-vault/pull/278.

            Once this is merged – I suggest that you move over to the complete tool.

            2017-07-25

            Cloud-Agnostic: Friend or Foe?

            I have been working on a project for a while that includes the deployment of a large number of moving parts that are in a significant state of flux. Drops every two weeks, new features added all the time, and, of course, with a system this size there is a great amount of complexity involved. Complexity in the Continuous Integration stage, complexity with the end-to-end testing, and, definitely, complexity with the Continuous Deployment.

            A good part of the intricacies comes from the fact the development team wants to assure that the deployment will be cloud-agnostic. But before I go into if this would be a good or a bad thing, let me first explain what this means, and offer a few examples.

            Cloud Agnostic

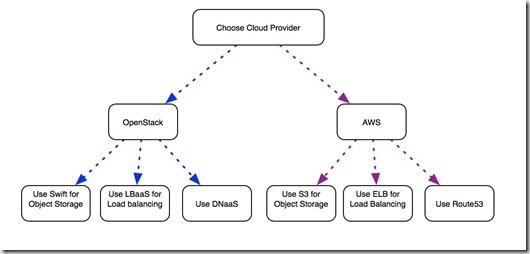
            It is no secret that almost no OpenStack cloud is identical to another. The network setup could be different (provider networks vs. private networks). Some clouds have Swift installed by default, while others do not. There are nuances and differences between an on-premises OpenStack deployment and using an OpenStack cloud provider, such as RackSpace. APIs are different, versions are different. This makes things very difficult for people writing software to interact with the cloud to address a fully cloud agnostic solution. APIs, authentication mechanisms, and the way you can access resources will change from one cloud to another.

            Read the rest of the article here

            2014-12-02

            Landing your first OpenStack Contribution

            In my previous post I showed you how to get your OpenStack git environment up and running by using a container.

            In this post we will go through the steps needed to actually contribute code. This will not be a detailed tutorial on how to use git and gerrit, and its functionality, but rather a simple step by step tutorial on how to get your code submitted for review in OpenStack.

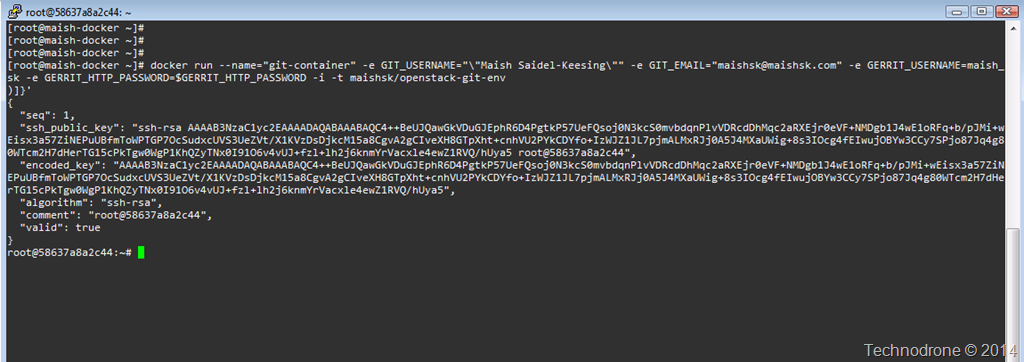
            First we start up the container.

            start container

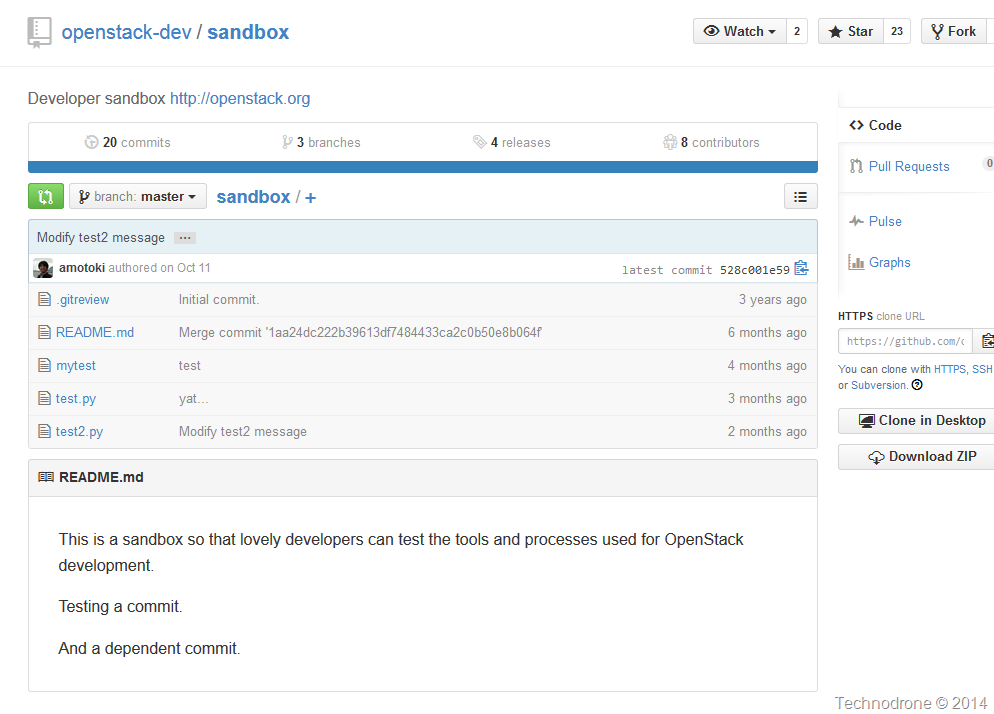
            Since playing around with real OpenStack code is not a good idea when you are just learning – there is a sandbox repository where you can perform all your tests.

            https://github.com/openstack-dev/sandbox

            First things first we need to clone the repository so that we have a local copy of the files

            git clone https://github.com/openstack-dev/sandbox

            git clone

            What this does is, you copy all the files in the repository to a folder of the same name under your current working directory. Depending on the size of the repo – this could take seconds or minutes.

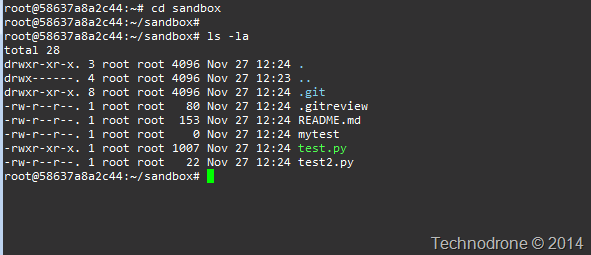
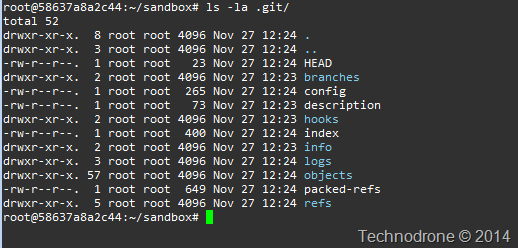
            Enter the directory and look at the files.

            cd sandbox
            ls –la

            file structure

            You will see the files are the same as the those on the repository on the web.

            github

            With the exception of one file the .git folder which is not visible on the github repository. This link will give you some more explanation as to what is in the folder.

            .git folder

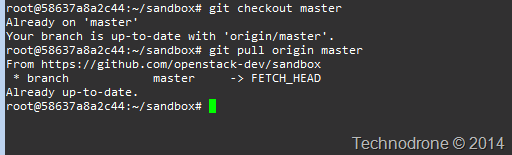
            Now make sure you have the latest code from Github.

            git checkout master
            git pull origin master
            git checkout
            Create a branch to do your work in that you'll do commits from.
            git checkout -b MYFIRST-CONTRIBUTION
            branch
            Now we get to the changes.
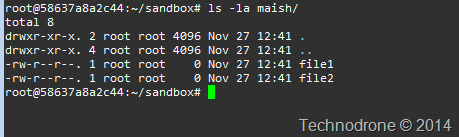
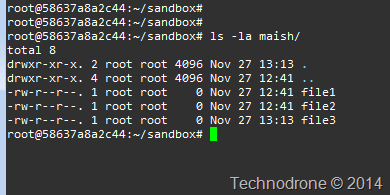
            I am going to create folder named maish with two files inside, like the structure shown below
            folder contents
            Here I just created empty files – but it could be correcting someone else’s code or adding new code, the process is the same.
            Once you have completed your work you will need to add all the changes and push them back up to the original branch.
            Add all the files and changes by running
            git add .
            Next, you commit your changes with a detailed message (and you should really understand how to commit proper changes) that'll be displayed in review.openstack.org, creating a change set.
            git commit –a
            git add

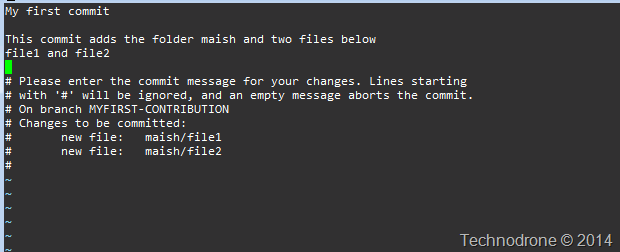
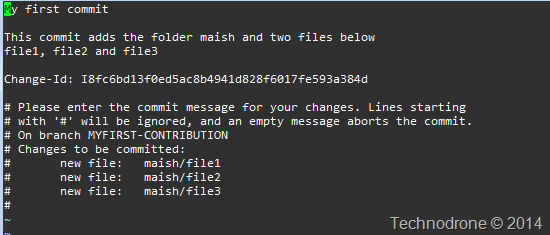
            A VI editor will open were you now can add the reasons for your change and mention any closed bugs. Follow the conventions about git commit messages giving a good patch description, adding a summary line as first line, followed by an empty line, descriptive text, backport lines and bug information:

            commit message

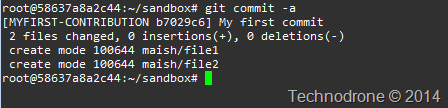
            Save the file by typing :wq, and you will see that your files and changes were added.

            commit result

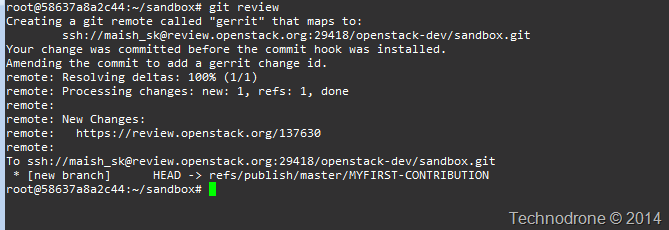
            Set up the Gerrit Change-Id hook, which is used for reviews, and run git review to run a script in the /tools directory which sets up the remote repository correctly:

            git review

            You might be asked prompted to accept the SSH key, type yes.

            If all goes you will see something similar to the output below.

            git review

            Looking back at the github repo – you will not see any changes. You might ask yourself – where did my code go?

            The reason you do not see any change – is that before any code is accepted in the master branch it has to be reviewed, both by an automated set of tests and also by humans.

            So where did it go?

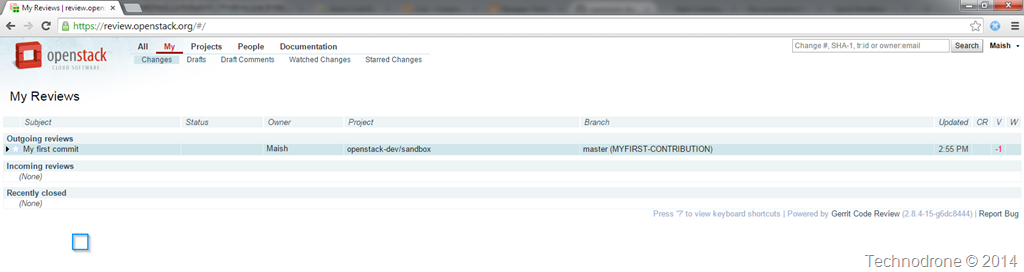
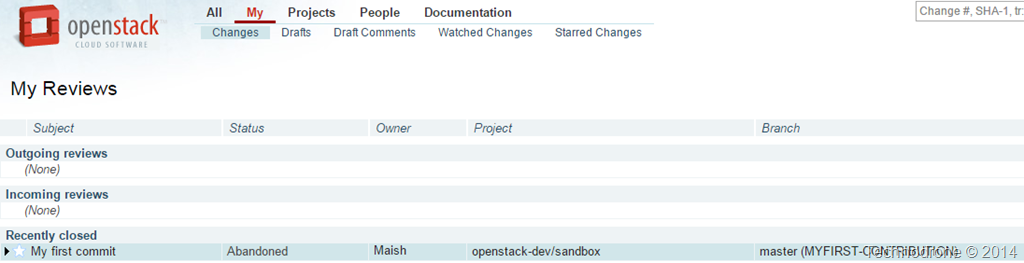
            If you go to https://review.openstack.org/#/ you will see the change you just submitted

            review.openstack.com

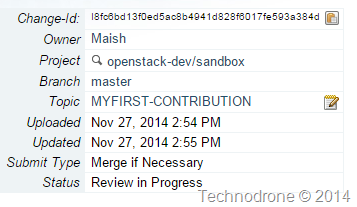
            Clicking on the change will take you to the details where you can see the following:

            The change information.

            change info

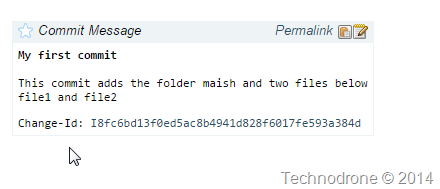
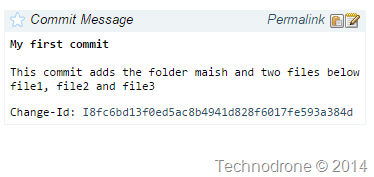
            The commit message (you will notice that the Change-Id was automatically added)

            commit message

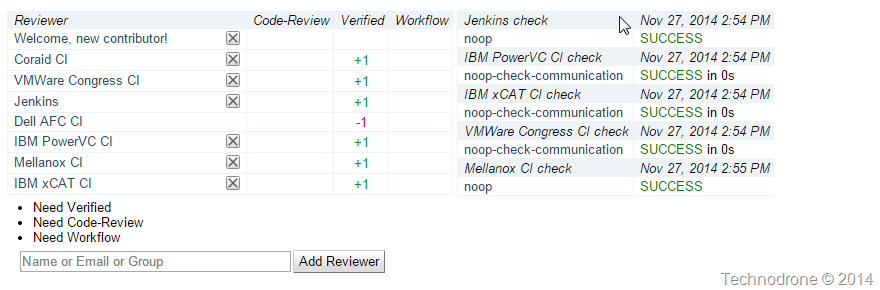
            The status of the reviews and feedback. This could be an automatic test or an actual person who reviewed and left a comment.

            reviewers

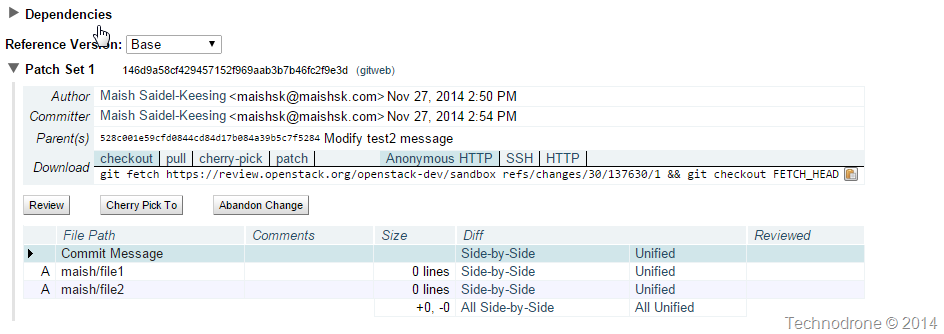
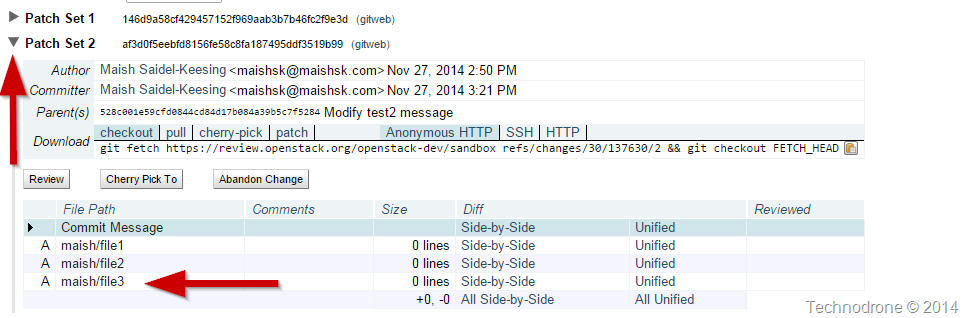
            Here are the files that were checked in.

            files

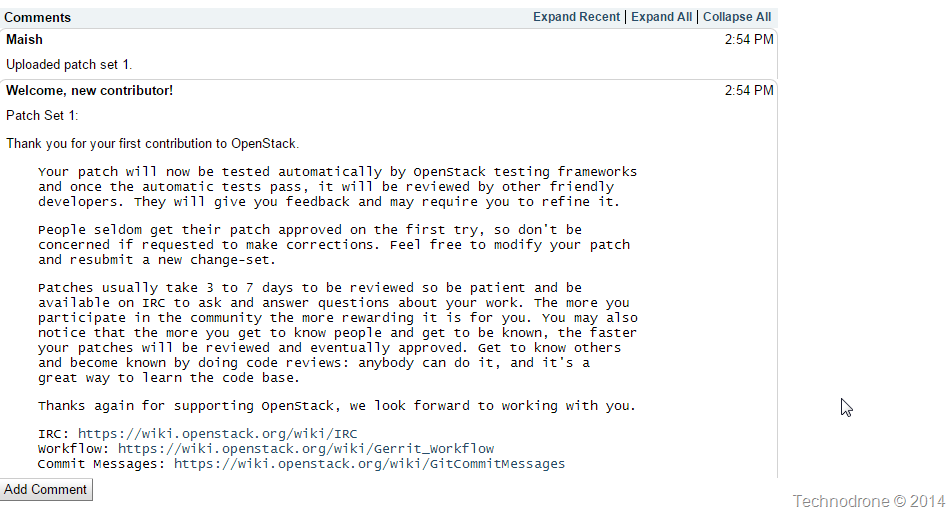
            And the comments themselves

            Comments

            I can also make and additional change as well – this could be based upon feedback from one of the reviewers, a failed test, or any other reason. Here I added another file – file3.

            new patch set

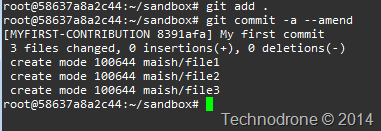
            I need to add the changed files and commit them again – this time with a flag –amend. You can change the commit message.

            git add .
            git commit –a –-amend

            commit message2

            commit result

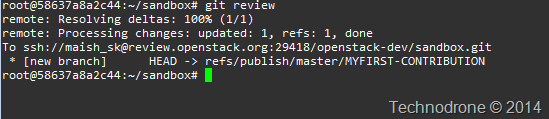
            And then push upstream.

            git review

            git review

            Going back to the web page you will see a few differences.

            The new commit message.

            new commit

            And that the code is now added as a new patch set – i.e. a new version of the code.

            new patch set

            One last thing.

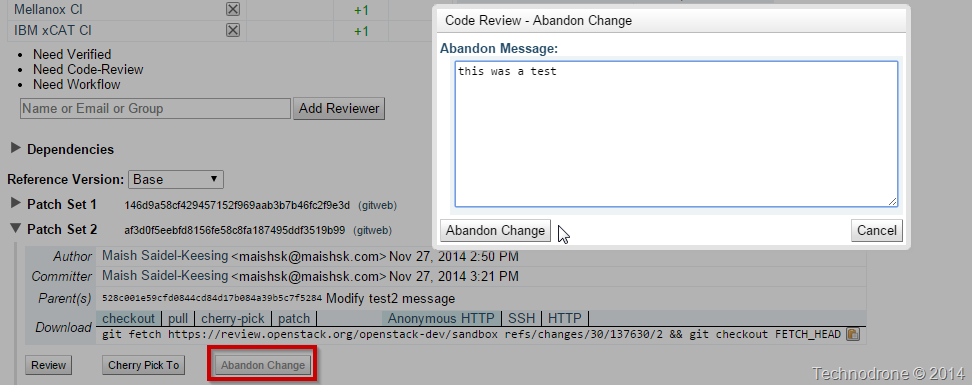
            Since this is a sandbox – please keep it clean. That means when you are finished with your tests you should mark your commit as Abandoned.

            abandon

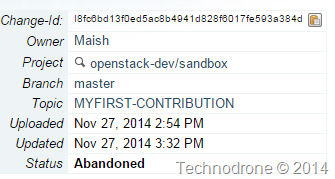
            The status will change.

            status change

            And this will change the status in you list of changes to Closed

            Closed

            I hope this was useful and will alleviate some of the concerns and people have with contributing code back into OpenStack.

            Please feel free to leave your comments and feedback below.

            2014-12-01

            Introducing VIRL Personal Edition

            This is an internal Cisco tool which is so useful – that I am really pleased that it is finally available for public consumption.

            VIRL Stands for Virtual Internet Routing Lab

            What Is VIRL?

            VIRL is comprehensive network design and simulation platform. VIRL includes a powerful graphical user interface for network design and simulation control, a configuration engine that can build complete Cisco configuration at the push of a button, Cisco virtual machines running same network operating systems as used in Cisco’s physical routers and switches, all running on top of OpenStack. virl

            How Does VIRL Work?

            VIRL uses the Linux KVM hypervisor and OpenStack as its virtual machine control layer, with a powerful API enabling the creation and operation of VMs in a simulated network topology. Users design their network using the VM Maestro design and control interface, with network elements such as virtual routers, switches and servers. The design is translated into a set of virtual machines running real Cisco network operating systems.

            What Does VIRL Offer?

            Design, learn and test with virtual machine running real Cisco network operating systems – IOS, IOS XE, IOS XR  and NX-OS as well as virtual machine running 3rd party operating systems. Build highly-accurate models of real-world or future networks, study the behaviour and configuration of routing protocols, break and fix your network and understand how to troubleshoot with a powerful integrated platform.

            The original information can be found here

            Cisco VIRL Personal Edition annual subscription license provides a scalable, extensible network design and simulation environment for several Cisco Network Operating Systems for students. This includes IOSv, IOS XRv, NX-OSv, CSR1000v as well as third party images such as Ubuntu Linux.

            Educational pricing is available for this product for college students, parents buying for a college student, or teachers, homeschool teachers and staff of all grade levels – limited to one purchase.

            VIRL enables users to:

            • Build highly-accurate models of real-world or future networks.

            • Learn and test with ‘real’ versions of Cisco network operating systems – IOSv, IOS XRv, NX-OSv and CSR1000v.

            • Integrate virtual network simulations with real network environments.

            • The download includes VIRL Personal Edition 1.0 Pre-Release software with a single-user annual license to manage up to 15 Cisco nodes.

            You can view a short demo of the product in the link below.

            VIRL Demo