2018-09-27

Replacing the AWS ELB - Final Thoughts

This is the last part in the Replacing the AWS ELB series.
  1. Replacing the AWS ELB - The Problem
  2. Replacing the AWS ELB - The Challenges 
    1. Replacing the AWS ELB - The Design
    2. Replacing the AWS ELB - The Network Deep Dive
    3. Replacing the AWS ELB - Automation
    4. Replacing the AWS ELB - Final Thoughts (this post)

    If you haven't already read the previous posts in the series - please take the time to go through them.

    So here are some additional thoughts and ideas about the whole journey.

    First and foremost - none of this would have been possible without group effort of the team that worked on this.
    Udi, Mark, and Mike - thank you all for your input, help and hard work that went into this.

    Was it all worth it?

    Yes, yes and hell yes!! The cost of having to refactor applications to work with the way that the AWS ELB works - was not financially viable and would take far to long . There was no way we could make our delivery dates and have all the applications modify the way they worked.

    So not only was it worth it - it was a necessity, without this - the project was a non-starter.

    What was the hardest part of the solution?

    Definitely the automation. We had the solution white-boarded out after a an hour or two, brought up a PoC within another hour or two.

    As I said somewhere else in the post - if this was a one-off then it would not have been worth while - but we needed about 10 pairs of haproxy instances in each deployment - and there were 10- 15 deployments - so manual was not going to work here. There was a learning curve that we needed to get over and that took some time.

    This can't be all you were doing with haproxy..

    Of course not.. The configurations in the examples are really basic and simple. The actual haproxy.cfg was a lot more complicated and was generated on the fly using Consul and consul-template. This allows for some very interesting and wonderful things that can be accomplished. The instances were what could be considered as pets, because they were hardly re-provisioned, but the configuration was constantly changing based on the environment.

    So did you save money?

    No! This was more expensive than provisioning an ELB from AWS. The constraints dictated that this was the chosen solution - not cost. Well in a way this was wasted resources, because there are instances that are sitting idle most of the time - without actually doing anything. The master-slave model is not a cost effective solution because you are spending money to address a scenario when (and if)  you lose a node.

    Does this scale? How?

    We played around with this a bit and also created a prototype that provisioned an auto scaling group with that would work active-active-active with multiple haproxy's - but this required some changes in the way we did our service discovery. This happened a good number of months after we went live - as part of the optimization stage.  Ideally - this would have been the way we would have chosen if we could do it over again.

    For this example the only way to scale is to scale up the instances sizes - not to scale out.

    So to answer the question above - in the published form - no it does not.

    Any additional benefits to rolling your own solution?

    This could be ported to any and every cloud - or deployment you would like. All you need to do it change the modules and the parts that interact directly with AWS with the cloud of your choice - and it would probably work. It is not a simple rip and replace - but the method would work - just would take a bit of extra time and coding.

    What about external facing load balancers - will this work?

    Yes, all you will need to do is replace the routes - with an elastic IP, and have the keepalived script switch the EIP from one instance to another. I should really post about that as well.

    So why did you not use an EIP in the first place?

    Because the this was internal traffic. If I was to use an external facing load balancer, the traffic would essentially go out to the internet and come back in - for two instances that were in the same subnet in the same AZ. This does not make sense neither from a financial nor a security perspective. 

    Can I contact you if I have any specific questions on the implementation?

    Please feel free to do so. You can either leave a comment on any of the posts in the series, ping me on Twitter (@maishsk), or use the contact me on the top.

    Replacing the AWS ELB - Automation

    This is Part 5 in the Replacing the AWS ELB series.
    1. Replacing the AWS ELB - The Problem
    2. Replacing the AWS ELB - The Challenges
      1. Replacing the AWS ELB - The Design
      2. Replacing the AWS ELB - The Network Deep Dive
      3. Replacing the AWS ELB - Automation (this post)
      4. Replacing the AWS ELB - Final Thoughts
      It goes without saying that anything that I have described in the previous posts can be accomplished - it is just a really tedious work to go through all the stages when you are doing this manually.
      Let's have a look at the stages
      1. Create an IAM role with a specific policy that will allow you to execute commands from within the EC2 instances
      2. Create a security group that will allow the traffic to flow between and to your haproxy instances
      3. Deploy 2 EC2 instances - one in each availability zone
      4. Install the haproxy and keepalived on each of the instances
      5. Configure the correct scripts on each of the nodes (one for master and the other for slave) and setup the correct script for transferring ownership on each instance.

      If you were to to all of this manually then this could probably take you a good 2-3 hours to set up a highly-available haproxy pair. And how long does it take to setup an AWS ELB? Less than 2 minutes? This of course is not viable - especially since it should be something that is automated and something that is easy to use.
      This one will be a long post - so please bare with me - because I would like to explain in detail how this exactly works.
      First and foremost - all the code for this post can be found here on GitHub - https://github.com/maishsk/replace-aws-elb (please feel free to contribute/raise issues/questions)

      (Ansible was my tool of choice - because that is what I am currently working with - but this can also be done in any tool that you prefer).

      The Ansible playbook is relatively simple

      Part one has 3 roles.

      1. Create the IAM role
      2. Create the security group
      3. Create the instances

      The part two - set's up the correct routing that will send the traffic to the correct instance
      The part three -  goes into the instances themselves and sets up all the software.

      Let's dive into each of these.

      Part One

      In order to allow the haproxy instances to modify the route they will need access to the AWS API - this is what you should use an IAM role for. The two policy files you will need are here. Essentially for this - the only permissions that the instance will need are:

      I chose to create this IAM role as a managed policy and not as a inline policy for some reasons that will be explained in a future blog post - both of these work - so you can choose whatever works for you.

      Next was the security group - and the ingress rule I used here - was far too permissive - it opens the SG to all ports within the VPC - the reason that this was done was because the haproxy here was used to proxy a number of applications - on a significant number of ports - so the decision was to open all the ports on the instances. You should evaluate the correct security posture for your applications.

      Last but not least - deploying the EC2 instances - pretty straight forward - except for the last part where I preserve a few bits of instance details for future use.

      Part Two

      Here I get some information about all the rout tables in the VPC you are currently using. This is important because you will need to update the route table entries here for each of the entries. The reason that this is done through a shell script and not an Ansible module - was because the module does not support updates - only create or delete - which would made the process of collecting all the existing entries, storing them and them adding a new one to the list - was far too complicated. This is an Ansible limitation - and a simple way to get around it.

      Part Three

      So the instances themselves have been provisioned. The whole idea of VRRP presumes that one of the nodes is a master and the other is  the slave. The critical question is how did I decide what should be the master and which one would be the slave?

      This was done here. When the instances are provisioned - they are provisioned in a random order, but they have a sequence in which they were provisioned - and it is possible to access this sequence - from this fact. I then exposed it in a simpler form here - for easier re-use.

      facts

      Using this fact - I can now run some logic during the software installation based on the identity of the instance. you can see how this was done here.

      identity

      The other part of where the identity of the node is used is in the jinja templates. the IP address of the node is injected into the file based on the identity.

      And of course the script that the instance uses to update the route table uses facts and variables collected from different places throughout the playbook.

      bash_script

      One last thing of course. The instance I used was the Amazon Linux - which means that the AWS cli is pre-installed. If you are using something else - then you will need to install the CLI on your own.  The instances of course get their credentials from the IAM role that is attached, but when running an AWS cli command - you also need to provide an AWS region - otherwise - the command will fail. This is done with jinja (again) here.

      One last thing - in order for haproxy to expose the logs - a few short commands are necessary.
      Here you have a fully provisioned haproxy pair that will serve traffic internally with a single virtual IP.

      Here is asciinema recording of the process - takes just of 3 minutes


      In the last post - I will go into some of the thoughts and lessons learned during this whole exercise.

      2018-09-02

      Replacing the AWS ELB - The Design

      This is Part 3 in the Replacing the AWS ELB series.
      1. Replacing the AWS ELB - The Problem
      2. Replacing the AWS ELB - The Challenges
        1. Replacing the AWS ELB - The Design (this post)
        2. Replacing the AWS ELB - The Network Deep Dive
        3. Replacing the AWS ELB - Automation
        4. Replacing the AWS ELB - Final Thoughts

        So how do you go about using an IP address in a VPC and allow it to jump between availability zones?

        The solution to this problem was mentioned briefly in a slide in a re:invent session - which for the life of me I could not find (when I do I will post the link).

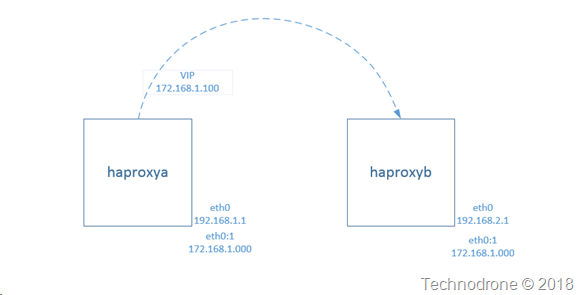
        The idea is to create an "overlay" network within the VPC - which allows you to manage IP addresses even though they don't really exist in the VPC.

        A simple diagram of such a solution would look something like this:

        standard_haproxy

        Each instance would be configured with an additional virtual interface - with an IP address that was not part of the CIDR block of the VPC - that way it would not be a problem to move it from one subnet to another.

        If the IP address does not actually exist inside the VPC - how do you get traffic to go to it?

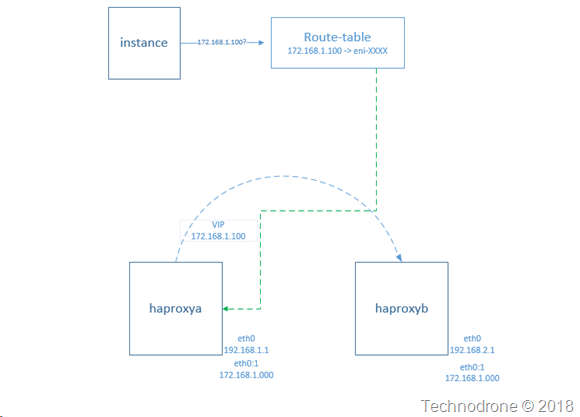
        That is actually a simple one to solve - by creating a specific route on each of the subnets - that routes traffic to a specific ENI (yes it is possible).

        add_route

        The process would be something like this:

        start

        An instance will try to access the virtual IP - it will go to the Route table on the Subnet and and because of the specific entry - it will be routed to a specific instance.

        The last piece of the puzzle is how do you get the route to jump from one instance to the other instance of haproxy, this would be the initial state.

        initial

        haproxya fails or the AZ goes down

        haproxya_fail
        haproxyb recognizes this failure
        recognize_failure

        And then makes a call to the AWS API to move the route to a different ENI located on haproxyb

        move_to_haproxyb

        In the next post - we will go into a bit more detail on how the network is actually built and how the failover works.