
Showing posts with label Linux. Show all posts

2013-01-23

The SSH Key Problem With Cloned Linux VM’s

First let me start off this by saying – the way this is effects you will differ entirely on your organizational procedures and security requirements.

We all love templates – don’t we? I mean they are the best! You configure your VM to your liking, OS patches, company policy settings etc.. etc.. and every new VM that you deploy – will have the exact same baseline.

Standardization… conformity… in the enterprise – all great.

Except.. a short while a go I found out something which is not exactly the best security practice (to put it mildly)

In vSphere you can create a Guest Customization specification and deploy your VM.

For Linux you can enter in some information, but not much

(Today I found out – that you also can run a custom script to configure the VM Configure a Script to Generate Computer Names and IP Addresses During Guest Operating System Customization in the vSphere Client )

But let’s get back on track.

So you have deployed a VM from a template – it now has an IP – and what is the first thing you would most probably do? SSH into the VM – because you now want to start doing the real work (amazing how we take the deployment of an OS for granted these days).

So if this is the first time you are connecting you will most probably get something like this:

Host key warning

Which to explain in simple terms is saying, “Hey – I don’t know this server – here are its details and RSA key. Do you still want to connect?”

And you would usually say – yes and enter your password – and all is fine and dandy.

What this does is add an entry to the .ssh/known_hosts file
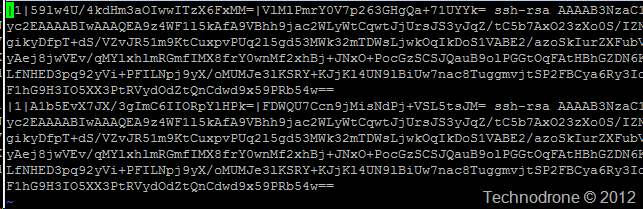
known_hostsBut not only did I deploy one VM from this template – I deployed 2. So let’s repeat the process again.

Host key warning

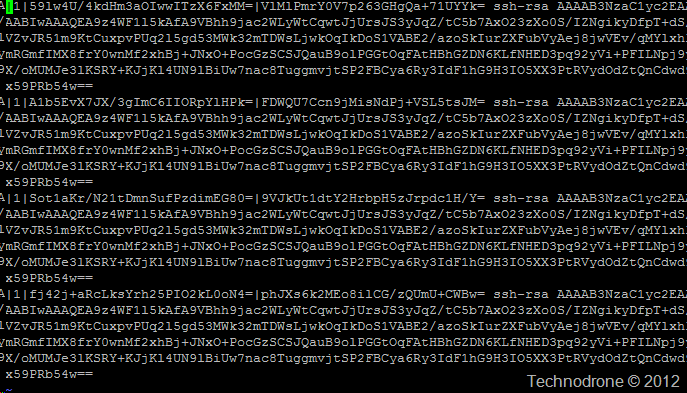
So where is the problem? If you look carefully – you will see that key fingerprint on vm1 is the same as on vm2

30:d6:df:54:ca:26:b2:a4:df:65:e5:33:9f:21:df:55

Identical.

And if we would now look into the known_hosts file then you would see this:
image

All exactly the same (each host created two lines for some reason on Ubuntu – usually it is one).

But why is that? Shouldn’t every VM be unique? I mean they have different MAC addresses, different UUID’s, different IP’s – VMware usually takes care of that.

Well it is pretty simple really – when SSH is installed, the OS package usually creates these files for you. But remember we are cloning from a template – after SSH was installed (that will usually be the case).

That now means – that every single VM that was deployed from the template now has the same exactly identical key.

That could be acceptable in your environment – maybe. Maybe not.

But take this example. You are providing vCloud services and your VM’s are spawned from the same templates. All … of… them!!!

Here you could have the same public keys in different organizations – different companies, I am sure you can see how bad this might become from a security perspective.

This can also cause havoc on certain monitoring systems and also will create a number of problems with SSH key authorization.

So how do you solve this? Unfortunately – there is no built-in way to do this with the current functionality in vSphere today. PowerCLI scripts – or other orchestration tools will need to be used to get around this.

What I would personally like is an option to run a guest OS script as part of the deployment process. Yes I know this exists for Windows VM’s today – but there is no such functionality for Linux.

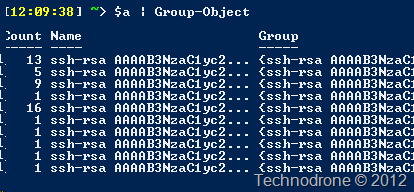
I did a quick check on some of the VM’s in one of the environments I have access to - 50 VM’s
Duplicates

There are duplicates – actually I was surprised to see that there some were actually unique.

Some food for thought… (which reminds me – time for me to go out for lunch).

Thanks to @brian_smi for the background information from his blog post!

It would be interesting to hear your thoughts and comments on how or if this might pose a problem in your environment. Please feel free to leave them in the comments below.

A quick update to this article. Thanks to Erik Bussink

Twitter

At the moment my recommended solution would be to remove the ssh_host_* files on the VM
before you power it down. The files will be recreated once the VM starts up (or a new VM is deployed from this template). Just make sure.. When you power on the template for maintenance – you must remove the files before your power it down again.

Thanks Erik!

2012-03-19

Cause a Linux Kernel Panic or a Windows BSOD

In some testing I was doing with VM HA monitoring – and I would highly recommend Duncan’s post for some more information on the subject - I needed to crash a VM to test the functionality.

So in essence what does it do?

When enabling this feature – VMware HA monitors the guest itself for Operating system failure and if recognized – it reboots the VM (according to the defined threshold)

So how do you crash a Windows VM? And how do you crash a Linux VM?

Windows

This Microsoft KB gives you the answers

Methods to generate a manual memory dump file
There are several methods to generate a manual kernel or complete memory dump file. These methods include using the NMI, keyboard (PS2/USB), remote kernel, or NotMyFault.exe tools.
How to generate a manual memory dump by using the NotMyFault tool
If you can log on while the problem is occurring, you can use the Microsoft SysInternals NotMyFault tool. To do this, follow these steps:
  1. Download the NotMyFault tool from the following Microsoft Web site:

    http://download.sysinternals.com/Files/Notmyfault.zip

  2. Click Start, locate and right-click Command Prompt, and then click Run as administrator.
  3. At the command line, type NotMyfault.exe /crash, and then press ENTER.
Note This will generate a memory dump file and a "Stop D1" error.
How to generate a manual memory dump file by using the keyboard
  • If you are using a PS/2 keyboard, you have to create the

    CrashOnCtrlScroll

    registry entry. For more information about how to generate a memory dump file by using the keyboard, click the following article number to view the article in the Microsoft Knowledge Base:

    244139  Windows feature lets you generate a memory dump file by using the keyboard

  • If you are using a USB keyboard, this feature is not supported in Windows Server 2008 Service Pack 1 until you install hotfix KB 971284. For more information about using the hotfix, click the following article number to view the article in the Microsoft Knowledge Base:

    971284  A hotfix is available to enable crash on CTRL-SCROLL support on Vista S about using the hotfix and Windows Server 2008 on a USB keyboard

    However, it is supported in Windows Server 2008 Service Pack 2 or later versions. You must create the CrashOnCtrlScroll registry entry on the Windows Server 2008-based computer for this feature to work. To enable the feature on a computer that uses a USB keyboard, follow these steps:

    1. Start Registry Editor.
    2. Locate and then click the following registry subkey:

      HKEY_LOCAL_MACHINE\SYSTEM\CurrentControlSet\Services\kbdhid\Parameters

    3. On the Edit menu, click Add Value, and then add the following registry entry.

      Name : CrashOnCtrlScroll 
      Data Type : REG_DWORD 
      Value : 1 
    4. Exit Registry Editor.
    5. Restart the computer. (On a computer that uses a USB keyboard, you do not have to restart the computer. Unplugging the keyboard and plugging it back again is sufficient. After that, the Memory dump file can be generated.)
    Note The keyboard operation will generate a memory dump file and a "Stop E2" error.
    This hotfix is included in Service Pack 2 for Windows Vista and Windows Server 2008.

From my testing – I could not get the manual method to work, so I tried the Sysinternals one  which worked well for me.

Windows BSOD

Linux

The easiest way I found to crash a Linux machine was to issue the following command at command prompt

echo c > /proc/sysrq-trigger

Which of course produces this:

Linux Panic

I wish for you that may these be the only crashes you encounter in your day.

Hope you enjoyed the ride…

2011-12-29

Internet Access is needed to Install vCLI 5.0

I came a cross a case this week that I thought would be worthwhile sharing.

A client needed to install the vCLI on a Linux machine, and this machine was behind a firewall that was blocking access to the internet.

image

The process was supposed to be very simple. Download the Tarball, copy it to the machine, untar and then install. But during the install this message popped up:

Do you accept? (yes/no) yes

Thank you.

ping: unknown host www.vmware.com
Network is unavailable, please configure the network first otherwise please
install the following modules manually for use by vSphere CLI:

Archive::Zip 1.20 or newer
Compress::Zlib 2.005 or newer
Compress::Raw::Zlib 2.017 or newer
version 0.78 or newer
IO::Compress::Base 2.005 or newer
IO::Compress::Zlib::Constants 2.005 or newer
Class::MethodMaker 2.10 or newer
HTML::Parser 3.60 or newer
UUID 0.03 or newer
Data::Dump 1.15 or newer
SOAP::Lite 0.710.08 or newer
URI 1.37 or newer
LWP 5.805 or newer
LWP::Protocol::https 5.805 or newer
VMware::VIRuntime 0.9 or newer
WSMan::StubOps 0.1 or newer

Ok I get it – the installation wanted access to the web that would download those modules. Due to my predicament with no internet on this machine – I downloaded the all the Perl modules on another machine and copied them over.

And by the way the easiest way to download the modules is by using CPAN, but in this case - they had to be downloaded and installed manually – which by the way this is the process:

  • Download the Module
  • Unpack the tarball
  • cd <package_name>
  • perl Makefile.PL
  • make
  • make test
  • make install

But even after installing the dependencies – vCLI still would not install – either it would ask for a proxy – or throw a message simlar to the one below.

SOAP::Lite 0.710.08 or newer
LWP 5.805 or newer
LWP::Protocol::https 5.805 or newer
VMware::VIRuntime 0.9 or newer
WSMan::StubOps 0.1 or newer

Thanks to William Lam – he pointed me to a workaround that allows for the installation to continue without internet access. 

The solution is to comment out a few lines in the install script – which will allow the installation to continue. I understand that there is already a feature request to change this behavior in the next version.

2010-08-05

Linux vs. Windows Live Conversion

I have been entrusted with converting a large number of Virtual machines that are currently hosted on Xen Server into the VMware Infrastructure.

There are all sorts of ways of migrating these a virtual machine exporting to VMDK's, Xen can export to a VMDK, convert to an OVF, other tools etc. I have found that the easiest way for the conversion is to treat the XEN VM as a live machine.

Besides all the different other lessons I am learning regarding the ins-and-outs of Xen Server  and their virtual machines, and all kinds of gotchas that you need to prepare for (look out for them in the upcoming blog posts). During the testing of the process, I noticed something quite interesting.

So the Xen VM is running either RHEL 4 / RHEL 5 / Windows XP / Windows 2003.

Importing Virtual machines directly with the vCenter Enterprise Converter is supports Windows targets only.

So in order to simplify the process and not have to use two different tools and procedures, I went with the vCenter Converter Standalone 4.0.1 for both flavors.

I will not put you through the steps on how to convert the live machine - you can actually refer to this post from a quite a while back.

Once the conversion starts - a new VM is created - as per your input, but this is where it differs.

A Linux conversion. The VM is powered on, connected to the network, booted with the helper ISO and the conversion begins. Creation of the partitions and copying them over one by one. Here are the screen shots of the converter and the details of the process in the vCenter as well.

image

image

And now a windows conversion. The VM is created but not powered on. The copy of the data actually takes place directly into the VM without having to use the Helper VM. Look at the screenshot below.

image

I find this quite interesting because I it seems that the conversion is occurring somehow in the background without having to use the helper VM. And even more so - if this can be done for a windows VM - why can this not be done also with a Linux VM?

I would be very interested in hearing if you have any more insight as to what happens in the background during the Windows Conversion.

Hope you enjoyed the ride.
