Showing posts with label Network. Show all posts

2019-02-22

Separate VPC's can do More Harm Than Good

I have come across this a number of times of the past couple of months. Environments that were born in the datacenter, have grown in the datacenter - in short people who are used to certain (shall we say - ‘legacy’) deployments, and they they are in the midst of an attempt to mirror the same architecture when moving to the cloud.

I remember in my old days that our server farm had a separate network segment (sometimes even more than one) when I was using physical servers, (while I write this - I actually think it has been about 4 years since I actually touched a physical server, or plugged a cable/disk/device into a physical server) for our Domain controllers, Applications servers, and users had their own network segments that were dedicated only to laptops and desktops.

In the physical/on-prem world - this made sense - at the time - because what usually happened was the dedicated networking team that managed your infrastructure used access lists on the physical network switches to control which networks could go where.

Fast forward to the cloud.

There are people which equate VPC’s with Networks (even though it makes more sense to equate subnets to networks - but that is besides the point) - and think that segregating different kinds of workloads into multiple VPC’s will give you better security.

Let me give you a real scenario that I was presented with not too long ago (details of course have been changed to protect the innocent … )

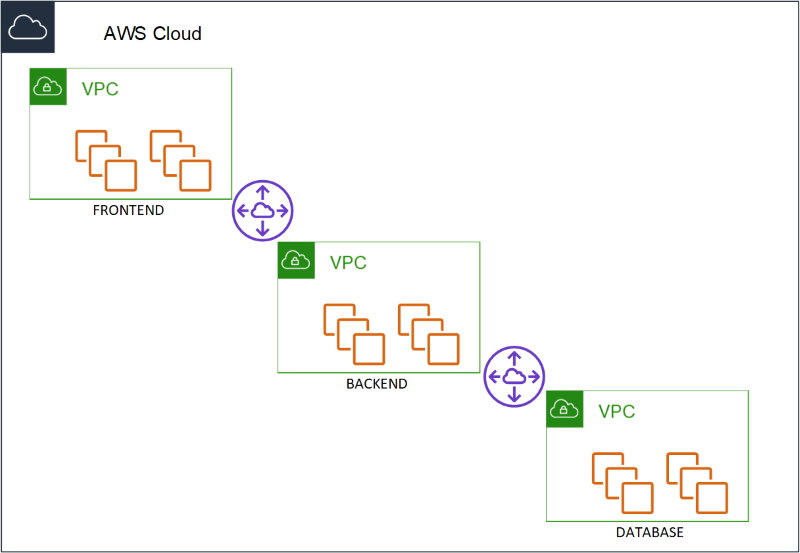
A three tier application. Database, Application and a frontend. And the requirement that was laid down from the security team was that each of the layers must reside in the their own VPC. Think about that for a minute. Three VPC’s that would be peered to ensure connectivity between them (because of course the 2/3 layers needed to communicate with each other - Database - application and application to frontend). When I asked what was the reason for separating the three different layers in that way, the answer was, “Security. If for example one of the layer was compromised - it would be much harder to make a lateral move to another VPC and compromise the rest.”


So what is lateral movement? I know that there is no such a thing as a 100% secure environment. There will always be hackers, there will always be ways around any counter measures we try and put in place, and we can only protect against what we know and not against what we do not. The concept of lateral movement is one, of compromising a credential on one system and with that credential moving to another system. For example - compromising a Domain admin credential on an employees laptop - and with that credential moving into an elevated system (for example a domain controller) and compromising the system even further.

So how would this work out in the scenario above. If someone would compromise the frontend - the only thing they would be able to connect to would be the application layer - the frontend - does not have any direct interaction with the database layer at all, do your data would be safe. There would be a peering connection between the Frontend VPC an the Application VPC - with the appropriate routing in place to allow traffic flow between the relevant instances, and another peer between the Application VPC and the Database VPC - with the appropriate routing in place as well.

What they did not understand - is that if the application layer was compromised - then that layer does have direct connectivity with the data layer - and therefore could access all the data.

Segregating the layers into different VPC’s would not really help here.

And honestly - this is a risk that you take - which is why the attack surface you have - exposed on your frontend - should be as small as possible - and secure as possible.

But I came back to the infosec team and told them - what if I would provide the same security and segregation that you were trying to achieve but without the need of separate VPC’s ?

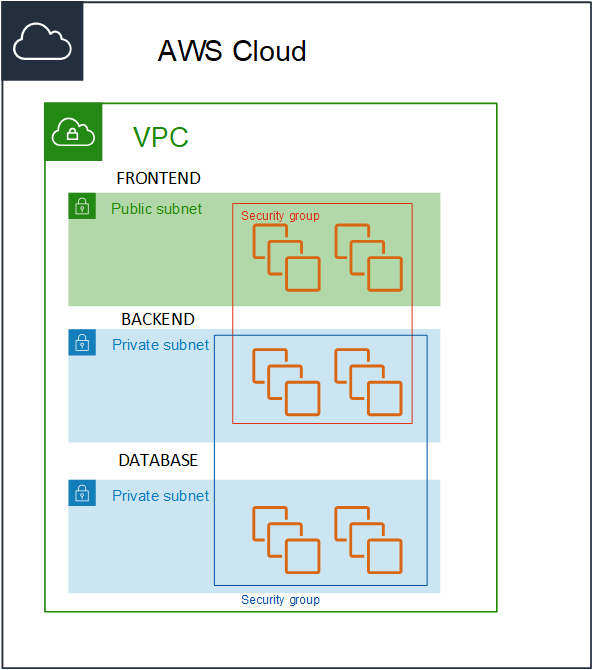
I would create a Single VPC - with three subnets and three security groups, Frontend, Application and Database. Instances in the frontend security group would only be allowed to communicate with the instances in the application security group on a specific port (and vice-versa) and the instances in the application security group would only be allow to communicate with the instances in the database security group (and vice-versa).


The traffic would be locked down to the specific flow of traffic and instances would not be able to communicate out of their security boundary.


As a side note - this could have also been accomplished by configuring very specific routes between the instances that needed to communicate between the VPC’s, but it does not scale to an environment larger than a handful of instances. Either you need to ensure that the IP addresses in a manual fashion, or keep on adding multiple routes in the route tables.

It goes without saying that if someone managed to compromise the frontend, and somehow managed through the application port to gain control into the application layer - they could gain access (in theory) to the data in the data layer.

Which is exactly what happened in the same scenario with 3 separate VPC’s. No less secure - no more.

But what changed??

The operational overhead of maintaining 3 VPC’s for no specific reason was removed.

This includes:

  • VPC Peering (which has a limit)
  • Route tables (which has a limit)
  • Cost reduction

I could even take this a bit further and say I do not even need different subnets for this purpose - I could actually even put all the instances in a single subnet and use the same mechanism of security groups to lock down the communication. Which is true. And in an ideal world - I probably would have done so - but in this case - it was a bit too revolutionary to already have made the step of going to a single VPC - and to go to a single subnet - was pushing the limit - maybe just a bit too far. Sometimes you need to take small victories and rejoice and not go in for the jugular.

I would opt into option of using separate VPC’s in some cases such as:

  • Different owners or accounts where you cannot ensure the security of one of the sides.
  • When they are completely different systems - such as a CI system and production instances
  • A number of other different scenarios

The bottom line of this post is - traditional datacenter architecture - does not have to be cloned into your cloud. There are cases where it does make sense - but there are cases where you can use cloud-native security measures - which will simplify your deployments immensely and allow you to concentrate as always on the most important thing. Bringing value to your customers - and not investing your time into the management and maintenance of the underlying infrastructure.


Please feel free contact me on Twitter (@maishsk) if you have any thoughts or comments.

2013-01-28

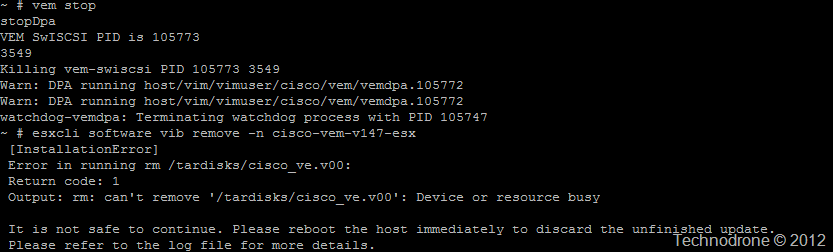
Error Removing Nexus 1000V VEM

I encountered this last week and was not find any reference to my specific problem – so I am documenting it here.
I was trying to remove the Cisco Nexus 1000V VEM from the ESXi hosts in my lab.
This was the error I was getting.
Fail1
This is what I had from the esxupdate.log file

2013-01-24T08:35:32Z esxupdate: LiveImageInstaller: DEBUG: Starting to live remove VIBs: Cisco_bootbank_cisco-vem-v147-esx_4.2.1.1.5.2b.0-3.1.1
2013-01-24T08:35:32Z esxupdate: LiveImageInstaller: INFO: Live removing cisco-vem-v147-esx-4.2.1.1.5.2b.0-3.1.1
2013-01-24T08:35:32Z esxupdate: vmware.runcommand: INFO: runcommand called with: args = '['/sbin/chkconfig', '-B', '/etc/chkconfig.db', '-D', '/etc/init.d', '-i', '-o']', outfile = 'None', returnoutput = 'True', timeout = '0.0'.
2013-01-24T08:35:32Z esxupdate: LiveImageInstaller: DEBUG: Running [['/etc/init.d/n1k-vem', 'stop', 'remove']]...
2013-01-24T08:35:32Z esxupdate: vmware.runcommand: INFO: runcommand called with: args = '['/etc/init.d/n1k-vem', 'stop', 'remove']', outfile = 'None', returnoutput = 'True', timeout = '0.0'.
2013-01-24T08:35:33Z esxupdate: LiveImageInstaller: DEBUG: output: svsStop, remove
svsStopRemove
stopDpa
Stopping Cisco Nexus 1000V VEM
stopDpa
Unload N1k switch modules
Warning: /dev/char/vmkdriver/stun not found
Unload of N1k modules done.
2013-01-24T08:35:33Z esxupdate: LiveImageInstaller: DEBUG: Starting to run etc/vmware/shutdown/shutdown.d/*
2013-01-24T08:35:33Z esxupdate: LiveImageInstaller: DEBUG: Trying to unmount payload [cisco-vem-v147-] of VIB Cisco_bootbank_cisco-vem-v147-esx_4.2.1.1.5.2b.0-3.1.1
2013-01-24T08:35:33Z esxupdate: LiveImageInstaller: DEBUG: Unmounting cisco_ve.v00...
2013-01-24T08:35:33Z esxupdate: vmware.runcommand: INFO: runcommand called with: args = 'rm /tardisks/cisco_ve.v00', outfile = 'None', returnoutput = 'True', timeout = '0.0'.
2013-01-24T08:35:33Z esxupdate: LiveImageInstaller: DEBUG: output: rm: can't remove '/tardisks/cisco_ve.v00': Device or resource busy
<…truncated..>
2013-01-24T08:35:33Z esxupdate: root: ERROR: InstallationError: ([], "Error in running rm /tardisks/cisco_ve.v00:\nReturn code: 1\nOutput: rm: can't remove '/tardisks/cisco_ve.v00': Device or resource busy\n\nIt is not safe to continue. Please reboot the host immediately to discard the unfinished update.")

I looked for some help on the web and came across this - Problems with uninstalling Nexus 1000v VEM VIB – and here it said perhaps the vem was still running.

So I tried that as well – here we see the vem is still running
vem status
Fail2
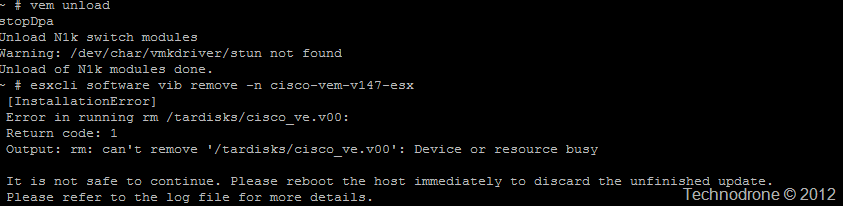
Even after stopping the vem – it would not remove the VIB. Maybe the modules were still loaded?
Fail3
Still no go…

I then came across these two KB’s

The vem-swiscsi process fails to exit even when no Software iSCSI device is found and High CPU and memory utilization by the vem-swiscsi process

They were not relevant to my versions – neither of ESXi nor the Cisco modules but still this led to the right solution.

I checked to see if I had any vem* processes still running.
lsof
After killing the processes.
kill process
The removal was successful.
Success!

The vem-swiscsi process was not killed properly when I stopped the vem (or removed the modules) – which I assume is a bug which was re-introduced since 4.2(1)SV1(5.1).

The Release Notes for Release 4.2(1)SV1(5.1) say that these bugs were resolved
17. CSCtl21012 The vem-swiscsi process fails to exit when no "Software iSCSI" device is found.
44. CSCtr83664 The vem-swiscsi process fails to exit when no "Software iSCSI" device is found.

In short – if you cannot remove the Cisco VEM from a ESXi host – check that there are no vem processes still running – that will prevent you removing the module.

I would like to also thank Frank Denneman for his very useful post on Removing orphaned Nexus DVS.

2010-02-16

Is 100mb Enough for the Service Console?

It is accepted practice amongst most of the virtualization world that you can use a 100mb/s link for your Service Console port, because there is not much traffic that is flowing over that link.

Well in the majority of the cases that is true.

For example. vmnic0 is running the Service Console. This link is connected at 1000mb/s

image

As you can see in the screen shot there is nothing really running through the Service Console (vmnic0)

But how about this

image

Now you would (and should) most definitely ask what is running through vmnic0 that is causing that amount of traffic.

It is not a Backup agent, no VMkernel on vmnic0 either. It was a regular virtual machine import.

image

A bit more of an explanation. How often does it happen that you are asked to import a virtual machine from somewhere?  A virtual appliance? A new image that has to go onto the ESX?

When importing a virtual machine into an ESX host, the traffic goes directly through the service console and it's vmnic.

As you can see that amount of traffic can easily surpass 100mb/s.

But if you have the option of only running a SC on 100mb/s then you will have to take into account the virtual machine imports will take longer - they can take much.. much longer if you run multiple simultaneous imports. I do not know what impact it will have on the other traffic that has to run on the Service console. I do not know of any QOS on ESX that will ensure that some kind of traffic is more important than others.

Finding a 100mb/s NIC is something that you will have to go on a treasure hunt for - we are at the time and age that a 1Gb is default and soon 10Gb will become the norm. the issue here is not the NIC - it is the switchport. Not everything can run on 1Gb end-to-end, so here is your limitation.

Solutions?

  1. Run your SC on 1Gb
  2. Share your SC with other ESX Network components (Vmkernel / VM Traffic) and lower the level of security for your ESX
  3. Create an aggregate to widen the "pipe"
  4. Run your SC on 100mb/s and take into account that virtual machine imports will take longer

Thanks to Tom Howarth, Scott Lowe, Roger Lund, Dave Graham, Mike LaSpina and Tommy Hall for joining in on the discussion.

2009-11-12

How To Bring Down A Single NIC In ESX?

I was installing a new ESX Host today, and before putting it into Production, I wanted to test that the Network Failover was working correctly.

Now instead of going over to the server and pulling out network cables, I started to think, there must be a way to do this (like all good administrators do) from the comfort of my desk.

Easiest would be – Log into the switch and shutdown the port. I agree, but what happens when your the Virtualization Team do not control the Physical network (my situation)? That was not an option.

I started to look if I could bring the interface down.

With regular Linux you would – ifdown eth0

[root@esx1 ~]# ifdown eth0
usage: ifdown <device name>

So that did not work! Pretty obvious why though… There is no eth0 interface.

[root@esx1 ~]# ifconfig
lo        Link encap:Local Loopback
          inet addr:127.0.0.1  Mask:255.0.0.0
          UP LOOPBACK RUNNING  MTU:16436  Metric:1
          RX packets:784233 errors:0 dropped:0 overruns:0 frame:0
          TX packets:784233 errors:0 dropped:0 overruns:0 carrier:0
          collisions:0 txqueuelen:0
          RX bytes:3017478364 (2877.6 Mb)  ...:3017478364 (2877.6 Mb)

vmnic0    Link encap:Ethernet  HWaddr 00:1A:64:E5:31:38
          UP BROADCAST MULTICAST  MTU:1500  Metric:1
          RX packets:6602129 errors:0 dropped:0 overruns:0 frame:0
          TX packets:237757 errors:0 dropped:0 overruns:0 carrier:0
          collisions:0 txqueuelen:1000
          RX bytes:1130250120 (1077.8 Mb) ..es:195027359 (185.9 Mb)
          Interrupt:113 Memory:92000000-92012100

vmnic1    Link encap:Ethernet  HWaddr 00:1A:64:E5:31:3A
          UP BROADCAST MULTICAST  MTU:1500  Metric:1
          RX packets:505 errors:0 dropped:0 overruns:0 frame:0
          TX packets:0 errors:0 dropped:0 overruns:0 carrier:0
          collisions:0 txqueuelen:1000
          RX bytes:303685 (296.5 Kb)  TX bytes:0 (0.0 b)
          Interrupt:201 Memory:94000000-94012100

vswif0    Link encap:Ethernet  HWaddr 00:50:56:4C:43:11
          inet addr:1.1.1.1  Bcast:1.1.1.255  Mask:255.255.255.0
          UP BROADCAST RUNNING MULTICAST  MTU:1500  Metric:1
          RX packets:2490053 errors:0 dropped:0 overruns:0 frame:0
          TX packets:260404 errors:0 dropped:0 overruns:0 carrier:0
          collisions:0 txqueuelen:1000
          RX bytes:664363188 (633.5 Mb)  TX bytes:196222902 (187.1 Mb)


So I tried..

[root@esx1 ~]# ifdown vmnic0
usage: ifdown <device name>

And that did not work either.

I did not want to shutdown the whole vSwitch – because then I would lose the connectivity (of course there is the possibility of creating the second Service Console – but this was not the case here)

The only way to do this is to manipulate the NIC’s directly. So what can you do with the physical NIC’s?

[root@esx1 ~]# esxcfg-nics
esxcfg-nics <options> [nic]
   -s|--speed <speed>      Set the speed of this NIC to one of 10/100/1000/10000.
                           Requires a NIC parameter.
   -d|--duplex <duplex>    Set the duplex of this NIC to one of 'full' or 'half'.
                           Requires a NIC parameter.
   -a|--auto               Set speed and duplexity automatically.  Requires a NIC parameter.
   -l|--list               Print the list of NICs and their settings.
   -r|--restore            Restore the nics configured speed/duplex settings (INTERNAL ONLY)
   -h|--help               Display this message.


So you cannot shut down the device, but you do the next best thing – set it to 10 Half-Duplex.

That will bring the port down.

[root@esx1 ~]#esxcfg-nics -s 10 -d half vmnic2


image

And to bring it back up

[root@esx1 ~]# esxcfg-nics -a vmnic2

Now unless there is a good reason – your ports should always be set to Auto-Negotiate, and in this casem when the nic was reset to auto – then it came back up without any issues.

The failover worked – so my experiment was successful.

image

Some might call it being a lazy Bum – I call it being a Good Administrator!!

Hope you enjoyed the ride!