Showing posts with label Powershell. Show all posts

2018-01-25

The #AWS PowerShell Docker Container

I cannot believe it is over 3 years since I created the openstack-git-env container. At the time I was really frustrated at how hard it was to get started with setting up an environment  to start contributing to OpenStack.

Well I have now moved on - focused primarily on AWS - and I have a good amount of PowerShell experience under my belt - but since I moved off a Windows laptop 3 years ago - I hardly use PowerShell anymore. Which is a shame.

Luckily Microsoft have released a version of PowerShell that will work on Mac and Linux - so I can start getting back on the horse.

I looked at the instructions for setting up PowerShell command for AWS - which led me to the AWS documentation page. But the missing link there - is how do you install PowerShell on your Mac/Linux machine - there is no documentation there. This is complicated ands error prone.

So I was thinking - there must be a container already available for PowerShell - it can’t be that everyone goes through the hoops of installing everything locally.

And lo and behold - there is one - https://hub.docker.com/r/microsoft/powershell/

So I built on top of this - the AWS PowerShell container.

All you need to do is set an alias on you machine, add a script that will launch the container - and Bob’s your uncle - you are ready to go.

All the information is located on the repository.

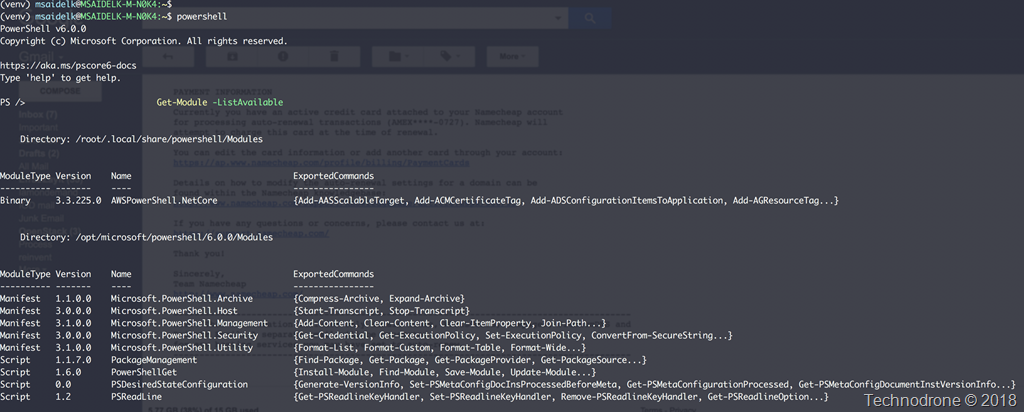
Screenshot at Jan 25 08-59-05

Please let me know if you think this is useful - and if there are any improvements your would like to see.

The code is on Github - feel free to contribute or raise any issues when/if you find them.

2015-08-26

PowerShell Profile Tricks for Better VMware Management

My new post on some PowerShell Profile tricks for VMware has been published on the
Petri IT knowledgebase.

As an IT pro, we rely on scripts to manage our VMware environment, which helps us be more efficient throughout our work day. In this article, I’d like to share some PowerShell profile tricks that are specific to VMware. These are tricks that I use on a daily basis, which I think you’ll find helpful .. ..

Read the full post

2013-10-01

Interesting Tidbit in #PowerCLI Release Notes

With last week's release - there was also an updated version on PowerCLI that was released as well.

VMware vSphere PowerCLI 5.5 Release 1 Release Notes

I noticed something quite strange (personally I have not yet hit this bug - but I am sure it must have happened to someone)

image

That sounds like fun… :)

So I put a question up on the the PowerCLI community.

What exactly does this mean?
Will it run the first 2?
Last 2?
Even lines?
Odd lines?
Just choose which some random lines?

I received the answer from Dimitar and thought that it would be worthwhile to share it with you all.

What this means is that it will either run the whole script or just the first line. We haven't been able to work out exactly what causes this, but we believe it has something to do with the way we escape special symbols and redirect the output in the script before sending it to the guest OS.

This is not a new issue for this release, but we decided to add it to the release notes. There are a couple of workarounds for this
1) make the script single line
2) save the script in a .bat file, upload it to the guest using Copy-VMGuestFile and execute the file using Invoke-VMScript.

Something you might want to remember…

2013-05-20

Change Outlook Meetings En Masse

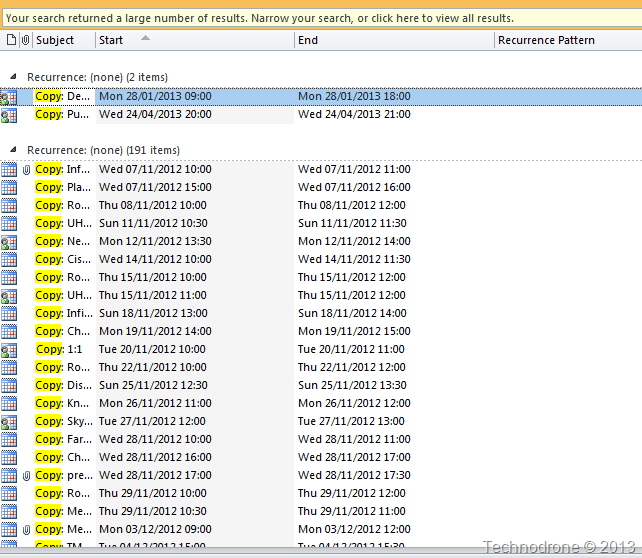
I had my mailbox migrated to a new domain today. One of the side effects of this was that for silly reason, a large number of my meetings now had a prefix of Copy: added to the subject of the meeting.

image

Which annoyed the hell out of me.

Now I could go ahead and remove all the extra information one by one - but that is tedious annoying and against my automation principles.

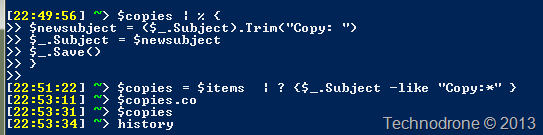
So starting with this post Retrieve all-day appointments in Outlook with PowerShell and this one as well Create Outlook Appointments from PowerShell, I have managed to change all the outlook appointments that have the extra text in the subject line with the following lines of code

$olApp = New-Object -COM Outlook.Application
$namespace = $olApp.GetNamespace("MAPI")
$fldCalendar = $namespace.GetDefaultFolder(9)
$items = $fldCalendar.Items
$copies = $items  | ? {$_.Subject -like "Copy:*" }
$copies | % {
	$newsubject = ($_.Subject).Trim("Copy: ")
	$_.Subject = $newsubject
	$_.Save()
}

Before

Before

After

After

Gotta Love PowerShell!!

2013-02-21

vCenter Automated Install

So how long does it take you to install vCenter, not using the VCSA, but the Windows package? How many manual steps does it require you to perform? Have you actually ever counted? It is quite a lot.

I was presented with the following requirements for a project:

  • We need to install vCenter as part of a deliverable for a customer
  • The Installation should standard and repeatable.
  • The database will be on an external Oracle VM.
  • The process should be automated.
  • The whole process must be logged to a file.

So you might ask – why would you do this for a one time thing – I agree – you really wouldn’t. But in my case since this was to be used to deliver a solution to a substantial number of customers – then repeasting a manual installation each time was completely out of the question.

Going back to vCenter 5.0 it was actually pretty simple. Well not really simple but there are less moving parts, you run one script – pass the correct parameters, and hey presto you have a vCenter installed.

In vCenter 5.1, VMware made life a lot more complicated. When you install vCenter – you actually install 3 separate packages (and they have to be in the following order):

  1. Single Sign On
  2. Inventory Service
  3. vCenter Server

You can then also install the Web client – but this is not mandatory – but it is advised – this will be the last version of the Windows vSphere Client – you had better start getting used to the Web Client – so actually there are 4 packages.

VMware has separated this into two methods one of which is called the – Simple Install – which will install the whole thing for you in one shot – but your options of customization here are limited. Everything is installed with the defaults – all with embedded SQL databases – but not really what I would call production ready. That means you will need to install them separately.

Before I start I would like to point to two invaluable resources that helped me in preparing these scripts. This thread on VMTN (GrantOrchard provided the the syntax) and the Command-Line Installation and Upgrade of VMware vCenter Server 5.1 document – which has all the information you need.

There are a few points that I would like to make clear.

  • This post will not explain how to setup the Oracle Client on your vCenter server (that will require a separate post)
  • This post will not explain how to create the tablespaces and apply grants on the Oracle database. VMware do a good job of explaining that here (perhaps I will elaborate this post a bit further in the future on how that can be done in an automated way).

These are the pre-requisites to start with.

  1. You have an Oracle client on your Windows vCenter server – already pre-configured. In my case this was Oracle Thin Client.
  2. Powershell is installed
  3. Your tnsnames.ora is already configured.
  4. You have a remote Oracle Database VM.
  5. Both the vCenter tablespace and the Single Sign On tablespaces have already been created with their appropriate users and proper grants as documented here.
  6. You have an ODBC connection already setup and verified from the (to be) vCenter VM.
  7. The environment I am installing does not have DNS resolution between the VM’s therefore the hostname and IP of the database server need to be set in the hosts file.

And now to the script – annotations are at the end:

 ## =====================================================================
## Title       : vCenter51_Install
## Description : This script will install all the necessary components
##				 needed for vCenter 5.1
## Author      : Maish Saidel-Keesing
## Date        : 19/02/2013
## Usage	   : PS>  .\vcenter51_install.ps1
## Notes	   : More information about this scipt can be found at
##	    	     http://technodrone.blogspot.com
## Version     : 1.0.1
## =====================================================================

## Start Logging
$ErrorActionPreference="SilentlyContinue"
Stop-Transcript | out-null
$ErrorActionPreference = "Continue"
$transcriptpath = ".\vCenter_install_" + (Get-Date -Format dd-MM-yyyy_HH-mm) + ".log"
Start-Transcript -path $transcriptpath -append | Out-Null

#Update Hosts file
$vcenterdb = Read-Host "Please Enter the IP address of the vCenterDB (Oracle) Server"
$hostsfile = "C:\Windows\System32\drivers\etc\hosts"
if (!$((Get-Content $hostsfile) | Select-String "vcenterdb")) {
	Write-host "Adding vcenterDB to the hosts file..." -ForegroundColor Green
	Add-Content "`r`n`n$vcenterdb`tvcenterdb" -Path $hostsfile
	if (((Get-Content $hostsfile) | Select-String "vcenterdb") -eq $null) {
		Write-Warning "Hosts file was not updated correctly!! Exiting.."
		break
	}
}

if (!$(Test-Path -Path 'c:\temp')) {
	New-Item -ItemType Directory -Path 'c:\temp' | Out-Null
}

#Define Parameters
$VCMedia = "C:\installs\VMware-VIMSetup-all-5.1.0-947939"
$LIKey = ""
$Username = "Maish"
$CompanyName = "maish"
$ODBCName = "vCenter"
$DBUser = "vpxadmin"
$DBPass = "vpxadmin"
$SSOpasswd = "Hello!2"
$RSA_USER = "RSA_USER"
$RSA_DBA = "RSA_DBA"
$SSO_ADMIN_USER = "admin@System-Domain"
$wipedb = "FORMAT_DB=1"
$vcenterIP = (Get-WmiObject -Class Win32_NetworkAdapterConfiguration -Filter IPEnabled=TRUE -ComputerName .).IPAddress

#SSO installation
Write-Host "Installing Single Sign On" -ForegroundColor Green
$exe = "$VCmedia\Single Sign On\VMware-SSO-Server.exe"
$myargs = '/L1033 /v"/qr MASTER_PASSWORD=' + $SSOpasswd + ' RSA_DBA_PASSWORD=' + $RSA_DBA + ' RSA_USER_PASSWORD=' + $RSA_USER
$myargs = $myargs + ' CONFIG_TYPE=Setup SETUP_TYPE=Basic SSO_DB_SERVER_TYPE=Custom JDBC_DBTYPE=Oracle'
$myargs = $myargs + ' JDBC_DBNAME=VCENTER JDBC_HOST_PORT=1540 JDBC_HOSTNAME_OR_IP=vcenterdb ORACLE_SERVICE_OR_SID=VCENTER'
$myargs = $myargs + ' SKIP_DB_USER_CREATION=1 DBA_JDBC_USERNAME=' + $RSA_DBA + ' DBA_JDBC_PASSWORD=' + $RSA_DBA
$myargs = $myargs + ' JDBC_USERNAME=' + $RSA_USER + ' JDBC_PASSWORD=' + $RSA_USER + ' COMPUTER_FQDN=\"' + $vcenterIP
$myargs = $myargs + '\" IS_SSPI_NETWORK_SERVICE_ACCOUNT=1 SSO_HTTPS_PORT=7444 /L*v \"C:\temp\ssoinstall.log\""'
Start-process $exe $myargs -Wait

#Inventory Service installation
Write-Host "Installing Inventory Service" -ForegroundColor Green
$exe = "$VCmedia\Inventory Service\VMware-inventory-service.exe"
$myargs = '/L1033 /v"/qr QUERY_SERVICE_NUKE_DATABASE=1 SSO_ADMIN_USER=\"' + $SSO_ADMIN_USER + '\" SSO_ADMIN_PASSWORD=\"' + $SSOpasswd + '\"'
$myargs = $myargs + ' LS_URL=\"https://' + $vcenterIP + ':7444/lookupservice/sdk\" HTTPS_PORT=10443 FEDERATION_PORT=10111 XDB_PORT=10109'
$myargs = $myargs + ' TOMCAT_MAX_MEMORY_OPTION=S /L*v \"C:\temp\inventoryservice_install.log\""'
Start-process $exe $myargs -Wait

# Install vCenter 
Write-Host "Installing vCenter Server" -ForegroundColor Green
$exe = "$VCmedia\vCenter-Server\VMware-vcserver.exe"
$myargs = '/L1033 /v" /qr DB_SERVER_TYPE=Custom DB_DSN=\"' + $ODBCName + '\"  DB_USERNAME=\"' + $DBUser +'\" DB_PASSWORD=\"' + $DBPass + '\" ' + $wipedb
$myargs = $myargs + ' JVM_MEMORY_OPTION=S SSO_ADMIN_USER=\"' + $SSO_ADMIN_USER + '\" SSO_ADMIN_PASSWORD=\"' + $SSOpasswd + '\"'
$myargs = $myargs + ' LS_URL=\"https://' + $vcenterIP + ':7444/lookupservice/sdk\" IS_URL=\"https://' + $vcenterIP + ':10443\"'
$myargs = $myargs + ' VC_JDBC_URL=\"jdbc:oracle:thin:@vcenterdb:1540:VCENTER\" VPX_USES_SYSTEM_ACCOUNT=1 COMPUTER_FQDN=\"' + $vcenterIP + '\"'
$myargs = $myargs + ' VC_ADMIN_USER=\"Administrators\" VC_ADMIN_IS_GROUP_VPXD_TXT=true VCS_GROUP_TYPE=Single VCS_ADAM_LDAP_PORT=389'
$myargs = $myargs + ' VCS_ADAM_SSL_PORT=636 VCS_HTTPS_PORT=443 VCS_HTTP_PORT=80 TC_HTTP_PORT=8080 TC_HTTPS_PORT=8443 VCS_WSCNS_PORT=60099'
$myargs = $myargs + ' VCS_HEARTBEAT_PORT=902 /L*v \"C:\temp\vcenter_install.log\""'
Start-process $exe $myargs -Wait

#Install Web Client
Write-Host "Installing Web Client" -ForegroundColor Green
$exe = "$VCmedia\vSphere-WebClient\VMware-WebClient.exe"
$myargs = '/L1033 /v" /qr SSO_ADMIN_USER=\"' + $SSO_ADMIN_USER + '\" SSO_ADMIN_PASSWORD=\"' + $SSOpasswd + '\"'
$myargs = $myargs + ' LS_URL=\"https://' + $vcenterIP + ':7444/lookupservice/sdk\" HTTP_PORT=9090 HTTPS_PORT=9443'
$myargs = $myargs + ' /L*v \"C:\temp\weblient_install.log\""'
Start-process $exe $myargs -Wait

# Stop logging
Stop-Transcript

Lines 13-18 – Creates a log file of the transcript to the current directory of the script.

Lines 20-30 – Remember there is no DNS resolution – the user is prompted for the IP address of the Oracle database (vCenterDB) and the entry is added to the local hosts file.

Lines 32-34 – All vCenter component installation logs will be written to C:\temp. If the directory does not exist – it will be created.

Line 36 – License Key – in my case was blank – and will be added at a later stage.

Line 37 – Location of the vCenter installation package.

Lines 39-40 – Windows details.

Lines 41-43 – ODBC details this includes the ODBC connection and credentials.

Line 44 – This is the password that you will use for the Single Sign On admin@System-Domain user.

Lines 45-46 – This is the usernames and passwords for the database for SSO. if you followed the default creation scripts provided by VMware – then the username and passwords witll be the same. If not – then you should add the additional variables for the passwords.

Line 47 – The SSO admin user.

Line 48 – If there was existing data in database – clean it out.

Line 49 – since there is no name resolution – everything will be done with IP, here we retrieve the IP of the vCenter server. through WMI.

Lines 52-59 SSO Installation - create the arguments that will be passed to the MSI file. This could all be on one line but I broke it down for easier reading. Here we use the variables defined above.

Line 60 – Execute the installation and wait for the command to exit before continuing.

Lines 62-68 – Same as above but for the Inventory service. Here no database is necessary – only the credentials for SSO.

Lines 70-80 – vCenter Server installation.

Line 76 – I want to point out here that the VC_JDBC_URL is specific to the Oracle thin client you can see all the options here JDBC URL Formats for the vCenter Server Database.

Lines 82-88 – Web Client installation.

Line 91 – Stop the transcript.

I would like to stress again that this was created for a specific use case with Oracle – but the information here will be able to assist you in adapting the script to your environment.

Start to finish – less than 15 minutes to install a full vCenter. How do you like them apples??

apples

2013-01-24

Configuring SSH Equivalence for Oracle RAC

SSH Equivalence is one of the pre-requisites needed for an Oracle RAC installation. Scripting Fu
There are a number of posts on how to do this like here or here, and Oracle even have been so kind as to provide a script that will do this for you (even though it is not 100% automated.
The process is relatively simple (when you break it down piece by piece)
  1. Create the .ssh directory under the users /home folder for VM1 and VM2
  2. Create an RSA key on VM1 and VM2
  3. Copy the contents of ~/.ssh/id_rsa.pub from VM1 and VM2 into ~/.ssh/authorized_keys on both VM1 and VM2
  4. You should then be able to connect to each host (and also the localhost as well) without a password prompt.
  5. Repeat the process on both VM’s with the oracle user
But this process requires a decent amount of manual interaction from the user at the following stages:
  1. Copying the files between VM1 <-> VM2
  2. First connection prompts to add the hosts key to the ~/.ssh/known_hosts file
Manual interaction is the mother of all headaches when you want to automate something. As I have posted before here and here I am in the middle of automating a Oracle RAC deployment on VMware. This is an additional part of the solution.
I had to come up with a method to do this without any user interaction, and here is how I went about the process. I broke down the whole process – stage by stage.
  1. Re-create the ssh_host_rsa_key – the reason for this being – that since these VM’s are deployed from the same template – the ssh_host_rsa_key is identical – and this caused problems for my script (this actually could be useful in some cases – but not here).
  2. Create the ~/.ssh/id_rsa.pub key for the root user on each host – without prompts.
  3. In order to prevent the popup when connecting to another VM for the first time I needed to get the keys from ssh_host_rsa_key.pub into the .ssh/known_hosts before I connected to the VM for the first time.
  4. Add the public key from each VM into the ~/.ssh/authorized_keys file.
  5. Get this information from VM1 to VM2 and and vice-versa – and all of this without prompts – which meant I could not go through the guest operating system.
  6. Repeat the process for the oracle user.
So my initial challenge was how to do the copying of the files without going through the guest OS, but that actually turned out to be pretty simple. PowerCLI has the Copy-VMGuestFile cmdlet that will allow me to transfer files to and from the guest – so that solved my worries.
There were several issues along the way that I needed to address.
  1. I needed to construct the known_hosts file based on several pieces of information, the hostname, IP address and the ssh_host_rsa_key, I am sure there is a easier way of doing this in bash – but this way works for me.
  2. Creating the rsa keys for the oracle user – since I did not want to connect to the VM twice with two different credentials – here I solved the problem by duplicating the files from the root user to the oracle user and manipulated the contents a bit to suit my needs.
  3. Copying the files back to the guest after manipulation – resulted in a change in their format from UNIX to DOS and I could not find a way to control that from the PowerCLI side – therefore some vi manipulation was needed to convert them back.
So without further ado – here is the script – annotations are at the bottom
<#
 .SYNOPSIS
  Configure SSH equivalence between two Oracle RAC nodes

 .DESCRIPTION
  The script will execute on both guests, configure the RSA keys,
  known_hosts and authorized_keys files on each host for both the 
  root and oracle user to enable SSH equivalence for Oracle RAC

 .PARAMETER  VM1
  Name of the first VM
 .PARAMETER  VM2
  Name of the first VM
 .PARAMETER  VM1_IP
  The IP address of the first VM
 .PARAMETER  VM2_IP
  The IP address of the second VM
 .PARAMETER  HostCredentials
  The credentials for the ESXi host
 .PARAMETER  GuestCredentials
  The credentials for the guest VM 
 .PARAMETER Cleanup
  Will cleanup the temporary files created. On by default
 
 .EXAMPLE
  PS C:\> Set-SSHKeys -VM1 hosta -VM2 hostb -VM1_IP 10.10.10.1 -VM2_IP 10.10.10.2
  This example shows how to call the Configure-SSHKeys against hosta with the IP address
  of 10.10.10.1 and hostb with the IP address of 10.10.10.2.
 .EXAMPLE
  PS C:\> Set-SSHKeys -VM1 hosta -VM2 hostb -VM1_IP 10.10.10.1 -VM2_IP 10.10.10.2 -HostCredentials `
  (Get-Credential) -GuestCredentials (Get-Credential) -Cleanup:$false
  This example shows how to call the Configure-SSHKeys against hosta with the IP address
  of 10.10.10.1 and hostb with the IP address of 10.10.10.2. while prompting for credentials
  for both the host and the guest and not cleaning up the files after completion.

 .NOTES
  Author: Maish Saidel-Keesing
  Date: 20 January, 2012
  For more in depth info on the script please see:
  http://technodrone.blogspsot.com/2013/01/set-sshkeys.html

#>
function Set-SSHKeys {
 [CmdletBinding()]
 param(
  [Parameter(Position=0, Mandatory=$true)]
  [System.String]$VM1,
  [Parameter(Position=1, Mandatory=$true)]
  [System.String]$VM2,
  [Parameter(Position=2)]
  [System.String]$VM1_IP,
  [Parameter(Position=3)]
  [System.String]$VM2_IP,
  $HostCredentials,
  $GuestCredentials,
  $Cleanup=$true
 )
 # Check for parameters
 if (!$HostCredentials) {
  $HostCredentials = $Host.ui.PromptForCredential("ESXi Host Credentials","Enter the credentials for the ESXi Host","root","")
 }
 if (!$GuestCredentials) {
  $GuestCredentials = $Host.ui.PromptForCredential("Guest VM Credentials","Enter the credentials for the guest VM","root","")
 }
 if (!$VM1_IP) {
 $VM1_IP = (Get-VMGuestNetworkInterface -Name eth0 -vm $VM1 -HostCredential $HostCredentials -GuestCredential $GuestCredentials).IP
 }
 if (!$VM2_IP) {
 $VM2_IP = (Get-VMGuestNetworkInterface -Name eth0 -vm $VM2 -HostCredential $HostCredentials -GuestCredential $GuestCredentials).IP
 }
## script to be executed on VM1
$myscript1 = @"
mv /etc/ssh/ssh_host_rsa_key /etc/ssh/ssh_host_rsa_key.old
mv /etc/ssh/ssh_host_dsa_key /etc/ssh/ssh_host_dsa_key.old
ssh-keygen -t rsa -N "" -f /etc/ssh/ssh_host_rsa_key
ssh-keygen -t dsa -N "" -f /etc/ssh/ssh_host_dsa_key
mkdir ~/.ssh
ssh-keygen -t rsa -N "" -f ~/.ssh/id_rsa
echo -n `$(hostname -s) >> .ssh/known_hosts
echo -n "," >> .ssh/known_hosts
echo -n $VM1_IP >> .ssh/known_hosts
echo -n " " >> .ssh/known_hosts
cat /etc/ssh/ssh_host_rsa_key.pub >> .ssh/known_hosts
cat ~/.ssh/id_rsa.pub >> ~/.ssh/authorized_keys
mkdir /home/oracle/.ssh
cp .ssh/* /home/oracle/.ssh/
chown -R oracle:dba /home/oracle/.ssh
"@
## script to be executed on VM2
$myscript2 = @"
mv /etc/ssh/ssh_host_rsa_key /etc/ssh/ssh_host_rsa_key.old
mv /etc/ssh/ssh_host_dsa_key /etc/ssh/ssh_host_dsa_key.old
ssh-keygen -t rsa -N "" -f /etc/ssh/ssh_host_rsa_key
ssh-keygen -t dsa -N "" -f /etc/ssh/ssh_host_dsa_key
mkdir ~/.ssh
ssh-keygen -t rsa -N "" -f ~/.ssh/id_rsa
echo -n `$(hostname -s) >> .ssh/known_hosts
echo -n "," >> .ssh/known_hosts
echo -n $VM2_IP >> .ssh/known_hosts
echo -n " " >> .ssh/known_hosts
cat /etc/ssh/ssh_host_rsa_key.pub >> .ssh/known_hosts
cat ~/.ssh/id_rsa.pub >> ~/.ssh/authorized_keys
mkdir /home/oracle/.ssh
cp .ssh/* /home/oracle/.ssh/
chown -R oracle:dba /home/oracle/.ssh
"@
 # run the scripts on VM1 and VM2
 Invoke-VMScript -vm $VM1 -ScriptText $myscript1 -ScriptType bash -HostCredential $HostCredentials -GuestCredential $GuestCredentials
 Invoke-VMScript -vm $VM2 -ScriptText $myscript2 -ScriptType bash -HostCredential $HostCredentials -GuestCredential $GuestCredentials
 ## authorized_keys for root
 # get files from guests
 Copy-VMGuestFile -GuestToLocal -Source /root/.ssh/authorized_keys -Destination ./authorized_keys_VM1_root -VM $VM1 -HostCredential $HostCredentials -GuestCredential $GuestCredentials
 Copy-VMGuestFile -GuestToLocal -Source /root/.ssh/authorized_keys -Destination ./authorized_keys_VM2_root -VM $VM2 -HostCredential $HostCredentials -GuestCredential $GuestCredentials
 Copy-VMGuestFile -GuestToLocal -Source /home/oracle/.ssh/authorized_keys -Destination ./authorized_keys_VM1_ora -VM $VM1 -HostCredential $HostCredentials -GuestCredential $GuestCredentials
 Copy-VMGuestFile -GuestToLocal -Source /home/oracle/.ssh/authorized_keys -Destination ./authorized_keys_VM2_ora -VM $VM2 -HostCredential $HostCredentials -GuestCredential $GuestCredentials
 # Change root to oracle to fix running the script with root credentials
 Get-Item .\authorized_keys_*ora | % {
 (get-content $_).Replace("root@","oracle@") | Set-Content $_ -Force
 }
 # concatenate contents of files
 (Get-Content ./authorized_keys_VM1_root) + "`r`n" + (Get-Content ./authorized_keys_VM2_root) + "`r`n" + (Get-Content ./authorized_keys_VM1_ora) + "`r`n" + (Get-Content ./authorized_keys_VM2_ora) | Out-File -FilePath ./authorized_keys -Encoding ascii
 # copy files back 
 Copy-VMGuestFile -LocalToGuest -Source ./authorized_keys -Destination /root/.ssh/ -VM $VM1 -HostCredential $HostCredentials -GuestCredential $GuestCredentials -Force
 Copy-VMGuestFile -LocalToGuest -Source ./authorized_keys -Destination /root/.ssh/ -VM $VM2 -HostCredential $HostCredentials -GuestCredential $GuestCredentials -Force
 $vicmd = "/bin/vi +':w ++ff=unix' +':q' .ssh/authorized_keys"
 $return1 = Invoke-VMScript -ScriptText $vicmd -vm $VM1,$VM2 -HostCredential $HostCredentials -GuestCredential $GuestCredentials
 ## known_hosts for root
 # get files from guests
 Copy-VMGuestFile -GuestToLocal -Source /root/.ssh/known_hosts -Destination ./known_hosts_VM1 -VM $VM1 -HostCredential $HostCredentials -GuestCredential $GuestCredentials
 Copy-VMGuestFile -GuestToLocal -Source /root/.ssh/known_hosts -Destination ./known_hosts_VM2 -VM $VM2 -HostCredential $HostCredentials -GuestCredential $GuestCredentials
 # concatenate contents of files
 (Get-Content ./known_hosts_VM1) + "`r`n" + (Get-Content ./known_hosts_VM2) | Out-File -FilePath ./known_hosts -Encoding ascii
 # copy files back 
 Copy-VMGuestFile -LocalToGuest -Source ./known_hosts -Destination /root/.ssh/ -VM $VM1 -HostCredential $HostCredentials -GuestCredential $GuestCredentials
 Copy-VMGuestFile -LocalToGuest -Source ./known_hosts -Destination /root/.ssh/ -VM $VM2 -HostCredential $HostCredentials -GuestCredential $GuestCredentials
 $vicmd = "/bin/vi +':w ++ff=unix' +':q' .ssh/known_hosts"
 $return1 = Invoke-VMScript -ScriptText $vicmd -vm $VM1,$VM2 -HostCredential $HostCredentials -GuestCredential $GuestCredentials 
 ## authorized_keys for oracle
 # copy files back 
 Copy-VMGuestFile -LocalToGuest -Source ./authorized_keys -Destination /home/oracle/.ssh/ -VM $VM1 -HostCredential $HostCredentials -GuestCredential $GuestCredentials -Force
 Copy-VMGuestFile -LocalToGuest -Source ./authorized_keys -Destination /home/oracle/.ssh/ -VM $VM2 -HostCredential $HostCredentials -GuestCredential $GuestCredentials -Force
 $vicmd = "/bin/vi +':w ++ff=unix' +':q' /home/oracle/.ssh/authorized_keys"
 $return1 = Invoke-VMScript -ScriptText $vicmd -vm $VM1,$VM2 -HostCredential $HostCredentials -GuestCredential $GuestCredentials 
 ## known_hosts for Oracle
 # copy files back 
 Copy-VMGuestFile -LocalToGuest -Source ./known_hosts -Destination /home/oracle/.ssh/ -VM $VM1 -HostCredential $HostCredentials -GuestCredential $GuestCredentials
 Copy-VMGuestFile -LocalToGuest -Source ./known_hosts -Destination /home/oracle/.ssh/ -VM $VM2 -HostCredential $HostCredentials -GuestCredential $GuestCredentials
 $vicmd = "/bin/vi +':w ++ff=unix' +':q' /home/oracle/.ssh/known_hosts"
 $return1 = Invoke-VMScript -ScriptText $vicmd -vm $VM1,$VM2 -HostCredential $HostCredentials -GuestCredential $GuestCredentials 
 # remove temporary files
 if ($Cleanup) {
  Get-Item .\authorized_keys*, .\known_hosts* | Remove-Item -Confirm:$false 
 }
}
Lines 45-57 - The script requires some parameters (two are mandatory). The name of the VM’s that will be configured, their IP addresses, and if you would like to not remove the files created during the process, you should change the $Cleanup variable to $false (by default $true). Also in order to run scripts on the guests you will need to provide credentials for the hosts and the guests (I am assuming that all hosts have one password and also the guests have one password as well).

Lines 59-70 - If the credentials were not provided as variables – then you will be prompted. If the IP’s were not provided, they will be retrieved through the API.

Lines 72-106 - The script that should be run on the guests. There is one for each VM – due to the fact that the IP is (of course) different on each of them.
A bit more details about the script that is run on the guest. 
Lines 73-76 - The guest SSH keys are re-created as I explained above
Lines 77-78 – Create the .ssh directory and create the keys. –N is to set a blank password on the key and –f is for the path. 
Lines 79-83 - The known_hosts file is basically a concatenation of 3 things for each entry:
<hostname>, <IP_Address> <Contents of rsa_key.pub> (The commas and spaces are important!) 
Line 84 - Add the contents of id_rsa.pub to the authorized_keys file. 
Lines 85-87 – Copy the files into the oracle user’s directory and make sure sure the file ownership is correct.
Lines 108-109 – Run the scripts on each VM.

Lines 112-115 – Copy the files to the local computer for text manipulation.

Lines 117-118 – The authorized_keys are per user, and the ones we created for the oracle user were copies of those from the root user, so the username has to be changed.

Line 121 – Combine all 4 authorized_keys files into one, with carriage returns after each one.

Lines 123-126 – Copy the files back to the guests. And as I said above, the files needed some additional vi manipulation because during the copy back – they file type was incorrect.

Lines 129-137 – The same process for the known_hosts file. Take note – only one copy from each guest was needed, that is because it is VM specific and not user specific.The same vi manipulation as well.

Lines 140-149 – The process is repeated to place the files in the oracle user’s home directory.

Lines 151-153 – Cleanup the files – done by default.

2013-01-17

Another PowerShell vExpert.me URL Shortner

Building on Jonathan Medd’s excellent idea of Using PowerShell to access the vExpert.me URL Shortener, I decided to improve it a bit more.
Here is the completed script.
<#
 .SYNOPSIS
  Will create a new vExpert.me URL

 .DESCRIPTION
  Using the Invoke-Rest Cmdlet to invoke a creation of a new vExpert.me URL

 .PARAMETER  URL
  URL that should be shortened.
 
 .PARAMETER Custom
  The custom URL that should be used.

 .EXAMPLE
  PS C:\> New-vExpertURL -URL 'http://www.google.com'
  This example shows how to call the New-vExpertURL function with with the URL parameter and generate a random URL.

 .EXAMPLE 
  PS C:\> New-vExpertURL -URL 'http://www.google.com' -Custom this_is_my_link
  This will create a custome URL of http://vexpert.me/this_is_my_link pointing to http://www.google.com
 .INPUTS
  System.String

 .OUTPUTS
  System.String

 .NOTES
  For more information about advanced functions, call Get-Help with any
  of the topics in the links listed below.

#>
function New-vExpertURL {
 [CmdletBinding()]
 param(
  [Parameter(Position=0, Mandatory=$true)]
  [System.String]$URL,
  [Parameter(Position=1)]
  [System.String]$Custom
 )
 begin {
 if (!$($Custom) ) {
  $baseurl_2 = "&action=shorturl&format=json&url="
  } else {
  $baseurl_2 = "&action=shorturl&keyword=" + $Custom + "&format=json&url="
 }
 $baseurl_1 = "http://vexpert.me/yourls-api.php?signature="
 $secret = "xxxxxxxxx"
 
 }
 process {
 $invokeurl = $baseurl_1 + $secret + $baseurl_2 + $URL
 $vExpertme = Invoke-RestMethod -Uri $invokeurl
 $vExpertme.shorturl | clip
 Write-Host "The shortenend URL is now in your clipboard" -ForegroundColor Green
 }
 end {
 }
}
It is quite self explanatory. You will need to enter your personal secret code in Line 47.
So I added 4 things
  1. This is now a function – and it accepts parameters.
  2. One of the parameters is CustomURL which will allow you to enter your custom text if you please.
  3. The output will provide the URL and a success message.
  4. The URL will now be in your clipboard so you can use it.

2013-01-03

PowerCLI Does not officially support Powershell v3

Just a heads up. According to the Release Notes PowerCLI does is not supported

Release Notes

Does this mean that it will not work – No of course not!  From what I have tested it works almost flawlessly – but there are some quirks…

For example - Set-NetworkAdapter returning 'Operation is not valid due to the current state of the object' and Error with Move-VM: Operation is not valid due to the current state of the object.

And as Luc put it, “Well, you can't file a bug for something that is not supported, now can you Smile

Update – February 12th, 2013

VMware have now released an updated version – see the announcement here - PowerCLI 5.1 Release 2 Now Available

This will actually render this blog post obsolete – but I am happy VMware have addressed this issue.

2013-01-02

Invoke-VMScript Failed - and how I was Baffled.

Luc Dekens wrote a great post a while back Will Invoke-VMScript work? about the prerequisites needed in order to get Invoke-VMscript to work. Stop for a minute and go and read his post.

Glad to have back.

As part of an Oracle RAC provisioning script that I am working on – one of the first things I wanted to do was to configure the network settings for my two nodes – with parameters taken from a config file.

Of course if the VM does not have an IP address yet then you cannot configure it through the network, so here is where Invoke-VMscript comes into play. Huh?

A few things first off the bat. My configuration was working also with the 32-bit engine but also with the 64-bit engine as well. The rest of the prerequisites were all there.

So here is what was happening. In the script I had stored the HostCredentials and the Guestcredentials each in a variable. When it came time power on the VM’s,The script would wait for the VMware tools to start running in the guest before executing the command and then run my script inside the guest OS – but the command would fail with this message.

Invoke-VMScript : 02/01/2013 15:17:07    Invoke-VMScript        Error occured while executing script on guest OS in VM
'testdbCA1b'. Could not locate "Powershell" script interpreter in any of the expected locations. Probably you do not have enough permissions to execute command within guest.
At line:5 char:1
+ Invoke-VMScript -ScriptText $bb -vm $dbvm2 -HostCredential $hostcreds -GuestCred ...
+ ~~~~~~~~~~~~~~~~~~~~~~~~~~~~~~~~~~~~~~~~~~~~~~~~~~~~~~~~~~~~~~~~~~~~~~~~~~~~
    + CategoryInfo          : ResourceUnavailable: (testdbCA1b:VirtualMachineImpl) [Invoke-VMScript], VimException
    + FullyQualifiedErrorId : Client20_VmGuestServiceImpl_RunScriptCore_ExeLookupFailed,VMware.VimAutomation.ViCore.Cmdlets.Commands.InvokeVmScript

Now this was really weird – because this was completely not true. To make it even more baffling – when trying to run the commands manually – not as part of the script – it would work – without a problem. So I was starting to think that perhaps there was a problem that the credentials were not being passed properly down to the command – which was not likely – but still I had no other clue.

I then wondered – Invoke-VMscript – interacts with the VMware Tools in the guest through VIX – so maybe there was a problem there.

So I checked my versions (it was 1.12) and looked at the release notes and saw something there that ultimately led me onto the right path.

VIX

OK I was not getting any of these errors, but my command would not work. So I wanted to see what the logs of the VMware Tools in the guest were saying – after all it was interacting with the guest through VMware Tools. But where was the log?

KB1007873 - Enabling debug logging for VMware Tools within a guest operating system showed me the way to enable VMware Tools logging in a Linux VM.

You need to create a file (if it does not exist) /etc/vmware-tools/tools.conf and add to that file:

log = true
log.file = /tmp/vmtools.log

I then performed the following to test my theory.

  1. Restart the VM
  2. Wait for the tools to report Running and up-to-date
  3. Invoke-VMscript

This I did with a simple PowerShell script.

Restart-VM -VM $dbvm2 -Confirm :$false
Sleep 10
while (((get-vm $dbvm2 ).ExtensionData.Guest.ToolsRunningStatus ) -ne "guestToolsRunning" ) {
Write-Host "....." -ForegroundColor Yellow
Sleep 5
}

Invoke-VMScript -ScriptText $bb -vm $dbvm2 -HostCredential $hostcreds -GuestCredential $guestcreds
while ( $? -eq $false ) {
Get-Date -Format HH :mm :ss
sleep 2
Invoke-VMScript -ScriptText $bb -vm $dbvm2 -HostCredential $hostcreds -GuestCredential $guestcreds
}

So I noticed a few things.

  1. VMware Tools comes up and reports itself as running – way before the OS is actually available – and that you have a console prompt.
    Even before SSH starts
  2. The first 3-5 tries of Invoke-VMscript would fail – with the same error message I had before. And suddenly it would work as if nothing was wrong.

I went to look in the VMware Tools log that I had just configured and there I found something which I find very strange – but did solve my mystery but I still do not have the answer as to why it is happening.

For the failed attempts I had this in the log.

[Jan 02 13:17:06.925] [   debug] [vix] VixTools_StartProgram: args: progamPath: 'cmd.exe', arguments: '/C powershell -NonInteractive -EncodedCommand cABvAHcAZQByAHMAaABlAGwAbAAuAGUAeABlACAALQBPAHUAdABwAHUAdABGAG8AcgBtAGEAdAAgAHQAZQB4AHQAIAAtAE4AbwBuAEkAbgB0AGUAcgBhAGMAdABpAHYAZQAgAC0AQwBvAG0AbQBhAG4AZAAgACcAJgAgAHsAbABzACAALQBsAGEAfQAnACAAPgAgACIALwB0AG0AcAAvAHAAbwB3AGUAcgBjAGwAaQB2AG0AdwBhAHIAZQAwACIAOwAgAGUAeABpAHQAIAAkAGwAYQBzAHQAZQB4AGkAdABjAG8AZABlAA=='', workingDir: '

[Jan 02 13:17:11.988] [   debug] [vix] VixTools_StartProgram: args: progamPath: 'cmd.exe', arguments: '/C powershell -NonInteractive -EncodedCommand cABvAHcAZQByAHMAaABlAGwAbAAuAGUAeABlACAALQBPAHUAdABwAHUAdABGAG8AcgBtAGEAdAAgAHQAZQB4AHQAIAAtAE4AbwBuAEkAbgB0AGUAcgBhAGMAdABpAHYAZQAgAC0AQwBvAG0AbQBhAG4AZAAgACcAJgAgAHsAbABzACAALQBsAGEAfQAnACAAPgAgACIALwB0AG0AcAAvAHAAbwB3AGUAcgBjAGwAaQB2AG0AdwBhAHIAZQAwACIAOwAgAGUAeABpAHQAIAAkAGwAYQBzAHQAZQB4AGkAdABjAG8AZABlAA=='', workingDir: '

But for the successful attempt the log showed (which was what I expected)

[Jan 02 13:17:23.211] [   debug] [vix] VixTools_StartProgram: args: progamPath: '/bin/bash', arguments: '-c "bash > /tmp/powerclivmware0 2>&1 -c \"ls -la\""'', workingDir: '
[Jan 02 13:17:23.211] [   debug] [vmsvc] Executing async command: '"/bin/bash" -c "bash > /tmp/powerclivmware0 2>&1 -c \"ls -la\""' in working dir '/root'
[Jan 02 13:17:23.214] [   debug] [vix] VixToolsStartProgramImpl started '"/bin/bash" -c "bash > /tmp/powerclivmware0 2>&1 -c \"ls -la\""', pid 3792

ID-10081549Now here is the weird part. If you look at the first two failures – you will see that VIX trying to execute a Windows command on a Linux operating system – which…. probably .. won’t…. really…. work…. !!!

Only about 20 seconds later – did it execute the correct bash command – in my case ‘ls –la’ and it worked of course.

So here I found my way around my problem – but have not gotten to the bottom of the mystery yet. I put in an extra sleep statement into the script that would wait a bit longer until the OS was completely up and only then run the Invoke-VMscript command – and all was working fine…

So a few things I learned today:

  • How to enable logging for VMware Tools
  • VIX does weird things.
  • A workaround is as good of a solution as any other.
  • I would add one more thing to Luc’s prerequisites – wait until the VM has completely started before attempting to use Invoke-VMscript.

2012-12-27

Creating an EagerZeroedThick disk with PowerCLI

Hey…. -  that is not possible – I hear you say – well in principle you are right. Up until today…

By mistake of course – I found that there was a change made to the 5.1 release of PowerCLI – but this change has not been documented anywhere – which I think is a shame. This post is the only public reference I know of.

Up until the 5.1 release you could not create an EagerZeroedThick hard disk with PowerCLI. Let’s look at the 5.0 documentation for PowerCLI.

New-Harddisk

As you can see above the options are Thin or Thick and if you go to look at the
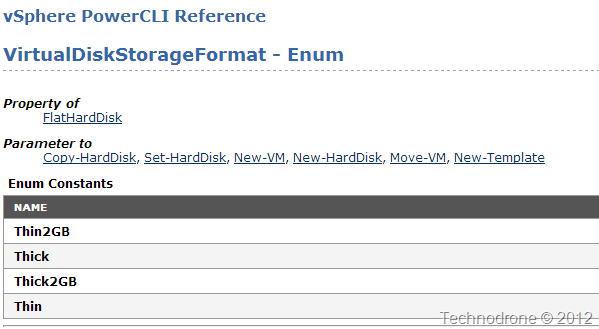
VirtualDiskStorageFormat – Enum you will see the that there is no EagerZeroedThick option.

Enum

The PowerCLI changelog has a new Cmdlet Move-Harddisk – which as you can see allows you to migrate a VMDK from one location to another – and if you also noticed..

5.1 New-Harddisk

Yep, EagerZeroedThick is one of the options as you can see above. The VirtualDiskStorageFormat – Enum was not updated though.

So I used this today as part of a bigger automation process to prepare some VM’s for Oracle RAC (which I will post about in the not too distant future)

get-vm $vm1 | New-HardDisk -DiskType flat -CapacityGB 2 -StorageFormat EagerZeroedThick -Datastore $dbds |New-ScsiController -Type ParaVirtual -BusSharingMode NoSharing

Which is so much easier than… (taken from Luc Deken’s post)

$vmName = <vm-name>
$vCenter = <vCenter-name>
$esxAccount = <ESX-account>
$esxPasswd = <ESX-password>

function Set-EagerZeroThick{
	param($vcName, $vmName, $hdName)

# Find ESX host for VM
	$vcHost = Connect-VIServer -Server $vcName -Credential (Get-Credential -Credential "vCenter account")
	$vmImpl = Get-VM $vmName
	if($vmImpl.PowerState -ne "PoweredOff"){
		Write-Host "Guest must be powered off to use this script !" -ForegroundColor red
		return $false
	}

	$vm = $vmImpl | Get-View
	$esxName = (Get-View $vm.Runtime.Host).Name
# Find datastore path
	$dev = $vm.Config.Hardware.Device | where {$_.DeviceInfo.Label -eq $hdName}
	if($dev.Backing.thinProvisioned){
		return $false
	}
	$hdPath = $dev.Backing.FileName

# For Virtual Disk Manager we need to connect to the ESX server
	$esxHost = Connect-VIServer -Server $esxName -User $esxAccount -Password $esxPasswd

# Convert HD
	$vDiskMgr = Get-View -Id (Get-View ServiceInstance -Server $esxHost).Content.VirtualDiskManager
	$dc = Get-Datacenter -Server $esxHost | Get-View
	$taskMoRef = $vDiskMgr.EagerZeroVirtualDisk_Task($hdPath, $dc.MoRef)
	$task = Get-View $taskMoRef
	while("running","queued" -contains $task.Info.State){
		$task.UpdateViewData("Info")
	}

	Disconnect-VIServer -Server $esxHost -Confirm:$false

# Connect to the vCenter
	Connect-VIServer -Server $vcName -Credential (Get-Credential -Credential "vCenter account")
	if($task.Info.State -eq "success"){
		return $true
	}
	else{
		return $false
	}
}

Set-EagerZeroThick $vCenter $vmName "Hard disk 1"

Ah the little things…..

I wonder what other gems are hidden deep in the bowels of PowerCLI that were not updated in the changelog/release notes?? …. What do you think ??

2012-10-16

Using Powershell to install PowerCLI

I am currently preparing a deployment package architecture for a full vSphere environment and one of the requests was to include PowerCLI in the installation script.

I was surprised that I could not find anything already mentioned on how to do this on Google.

So here is the syntax:

# Install PowerCLI
Set-executionPolicy RemoteSigned -Confirm:$false -force
Write-Host "Installing PowerCLI"
$myargs = $myargs = '/q /s /w /L1033 /v" /qn '
$exe = "C:\installs\VMware-PowerCLI-5.1.0-793510.exe"
Start-process $exe $myargs –Wait
Add-PSSnapin -Name VMware.VimAutomation.Core

Line 2:
Set the execution policy to RemoteSigned

Line 4-5: Prepare the installation syntax

Line 7: Add the PowerCLI Snapin

Easy as that!

2012-09-10

A Powershell Script to notify you on the vSphere 5.1 Release

vSphere 5.1 will most probably be released by the end of September 10th (that is 2 minutes from now in my timezone).

Of course nothing is 100% certain but I will explain on what this assumption is based.

  1. From this Press release 
    Press Release 1 
  2. From the VMware Unveils Industry’s Most Comprehensive Cloud Infrastructure and Management Solution press release
    Press Release 2
  3. September 11, 9-11. This is a sensitive date for especially for Americans. I doubt that anyone, let alone VMware, would go all out with the release multiple new versions of their software on this day. I assume it will be before that.
  4. vCAT 3.0 release end of day September 10, 2012

    vCAT
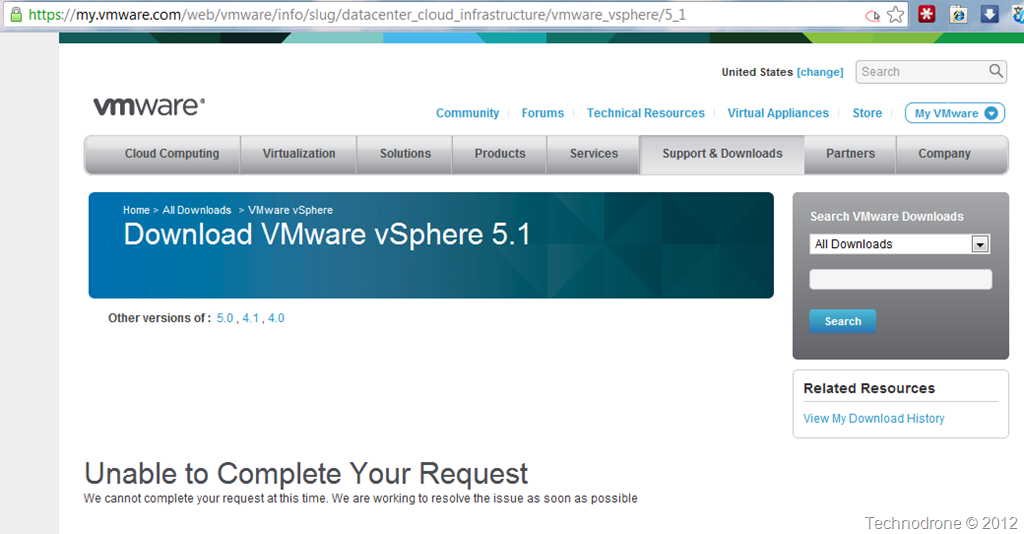
  5. vSphere 5.0 is available for download from here – but 5.1 is not – yet…

    Not yet

So instead of pushing F5 the whole day I wrote a very simple Powershell script to do it for me.

F5
F5

The basic function was taken from this post Using PowerShell to Query Web Site Information

Then the rest was easy.

Get the page. Parse the HTML and see if it still contains the Unable to Complete Your Request text.

If it does – that means the 5.1 site has not gone live. Sleep for 5 minutes, and check again.

If the text is no longer there – then probably the 5.1 bits are available. In that case – do something (like send me an email)

function Get-WebPage {
<#  
.SYNOPSIS  
   Downloads web page from site.
.DESCRIPTION
   Downloads web page from site and displays source code or displays total bytes of webpage downloaded
.PARAMETER Url
    URL of the website to test access to.
.PARAMETER UseDefaultCredentials
    Use the currently authenticated user's credentials  
.PARAMETER Proxy
    Used to connect via a proxy
.PARAMETER Credential
    Provide alternate credentials 
.PARAMETER ShowSize
    Displays the size of the downloaded page in bytes                 
.NOTES  
    Name: Get-WebPage
    Author: Boe Prox
    DateCreated: 08Feb2011        
.EXAMPLE  
    Get-WebPage -url "http://www.bing.com"
    
Description
------------
Returns information about Bing.Com to include StatusCode and type of web server being used to host the site.

#> 
[cmdletbinding(
	DefaultParameterSetName = 'url',
	ConfirmImpact = 'low'
)]
    Param(
        [Parameter(
            Mandatory = $True,
            Position = 0,
            ParameterSetName = '',
            ValueFromPipeline = $True)]
            [string][ValidatePattern("^(http|https)\://*")]$Url,
        [Parameter(
            Position = 1,
            Mandatory = $False,
            ParameterSetName = 'defaultcred')]
            [switch]$UseDefaultCredentials,
        [Parameter(
            Mandatory = $False,
            ParameterSetName = '')]
            [string]$Proxy,
        [Parameter(
            Mandatory = $False,
            ParameterSetName = 'altcred')]
            [switch]$Credential,
        [Parameter(
            Mandatory = $False,
            ParameterSetName = '')]
            [switch]$ShowSize                        
                        
        )
Begin {     
    $psBoundParameters.GetEnumerator() | % { 
        Write-Verbose "Parameter: $_" 
        }
   
    #Create the initial WebClient object
    Write-Verbose "Creating web client object"
    $wc = New-Object Net.WebClient 
    
    #Use Proxy address if specified
    If ($PSBoundParameters.ContainsKey('Proxy')) {
        #Create Proxy Address for Web Request
        Write-Verbose "Creating proxy address and adding into Web Request"
        $wc.Proxy = New-Object -TypeName Net.WebProxy($proxy,$True)
        }       
    
    #Determine if using Default Credentials
    If ($PSBoundParameters.ContainsKey('UseDefaultCredentials')) {
        #Set to True, otherwise remains False
        Write-Verbose "Using Default Credentials"
        $wc.UseDefaultCredentials = $True
        }
    #Determine if using Alternate Credentials
    If ($PSBoundParameters.ContainsKey('Credentials')) {
        #Prompt for alternate credentals
        Write-Verbose "Prompt for alternate credentials"
        $wc.Credential = (Get-Credential).GetNetworkCredential()
        }         
        
    }
Process {    
    Try {
        If ($ShowSize) {
            #Get the size of the webpage
            Write-Verbose "Downloading web page and determining size"
            "{0:N0}" -f ($wr.DownloadString($url) | Out-String).length -as [INT]
            }
        Else {
            #Get the contents of the webpage
            Write-Verbose "Downloading web page and displaying source code" 
            $wc.DownloadString($url)       
            }
        
        }
    Catch {
        Write-Warning "$($Error[0])"
        }
    }   
}  

$SMTP = "smtp.maishsk.local"

do {

	$a = Get-WebPage https://my.vmware.com/web/vmware/info/slug/datacenter_cloud_infrastructure/vmware_vsphere/5_1
	$test = $a -match "Unable to Complete Your Request"
	sleep 300
}
while ($test)

Send-MailMessage -From "Maish<maishsk@maishsk.local>" -To "Maish<maishsk@maishsk.local>" -Subject "vSphere 5.1 page has changed" -SmtpServer $SMTP
The script is not perfect, clean or optimized – but actually this shows you how to check for a change on a web page – which can be used in a large number of scenarios.

I will probably be asleep when vSphere 5.1 is released – but it will be interesting to see how accurate my script was – and at what time I received the notification from the script.

2012-05-13

Creating and Storing PowerShell Credentials

I actually do not understand why I have not put this in a blog post before, but it is about time - because I used it again today.

Sometime you need to store a credential for a number of purposes, be it a scheduled script - or just not having to enter credentials each and every time you would like to connect to a Host or your vCenter.

PowerCLI has it's own credential store with the New-VICredentialStoreItem and Get-VICredentialStoreItem cmdlets.

Personally - I do not like using this Cmdlet and have another method that I prefer using -System.Management.Automation.PSCredential.

First get the credential and store it in a file.

(Get-Credential).Password | ConvertFrom-SecureString | Out-File -FilePath C:\users\msaidelk\Documents\scripts\maish.cred


This will give you a string

Get-Content C:\users\msaidelk\Documents\scripts\maish.cred 01000000d08c9ddf0115d1118c7a00c04fc297eb01000000b215c3e1ee044b4286513bf7017abc8f0000000002000000000003660000c000000010000000d6533af1a8d6da153c0bf43713400cb30000000004800000a0000000100000008217a9ea26e47eba311ce8272156a7a2180000004c7047e3ca25bc540078e9dad60b0aff8ba48f37709534a614000000e582d7d6522c111d7101849 a27f8a9c034eb4ab6

To construct the credential again do this:

$vicred = New-Object System.Management.Automation.PsCredential "root", (Get-Content "C:\Users\msaidelk\Documents\scripts\maish.cred" | ConvertTo-SecureString) 

The object accepts two parameters: UserName, Password. They both have to be there and of course the username has to match the the credential that was originally entered for this to work

One other important point that I should point out is that when you import the credential – it has to be done with the same user that stored it in the file in the first place otherwise it will fail - like I tried below with a different user:

PS C:\Users\testa> $vicred = New-Object System.Management.Automation.PsCredential "root", (Get-Content "C:\temp\maish.cred" | ConvertTo-SecureString) ConvertTo-SecureString : Key not valid for use in specified state. At line:1 char:108 + ... \maish.cred" | ConvertTo-SecureString) + ~~~~~~~~~~~~~~~~~~~~~~ + CategoryInfo : InvalidArgument: (:) [ConvertTo-SecureString], C ryptographicException + FullyQualifiedErrorId : ImportSecureString_InvalidArgument_Cryptographic Error,Microsoft.PowerShell.Commands.ConvertToSecureStringCommand

You could do use this method Storing Passwords to Disk in PowerShell with Machine-key Encryption but that is overkill for my use case.

To summarize the process:

  1. Store the password in a file.
  2. Build the credential by providing the correct username and the content of the file and store it in a variable.
  3. Use the variable when connecting to your vCenter / Hosts.

In my Powershell $PROFILE I have the following three lines:

$vcenter = "msaidelk-lab1" $vicred = New-Object System.Management.Automation.PsCredential "MAISHSK\Maish", (Get-Content "C:\Users\msaidelk\Documents\scripts\maish.cred" | ConvertTo-SecureString) Connect-VIServer $vcenter -Credential $vicred

Every time I open a PowerCLI prompt (I usually do that to perform something on my environment), I now have a connection to my vCenter ready for me.